
CH7_Curriculum_CNC Teach System
today
2024-11-13
local_offer
Teach System
visibility
1581
7. Curriculum
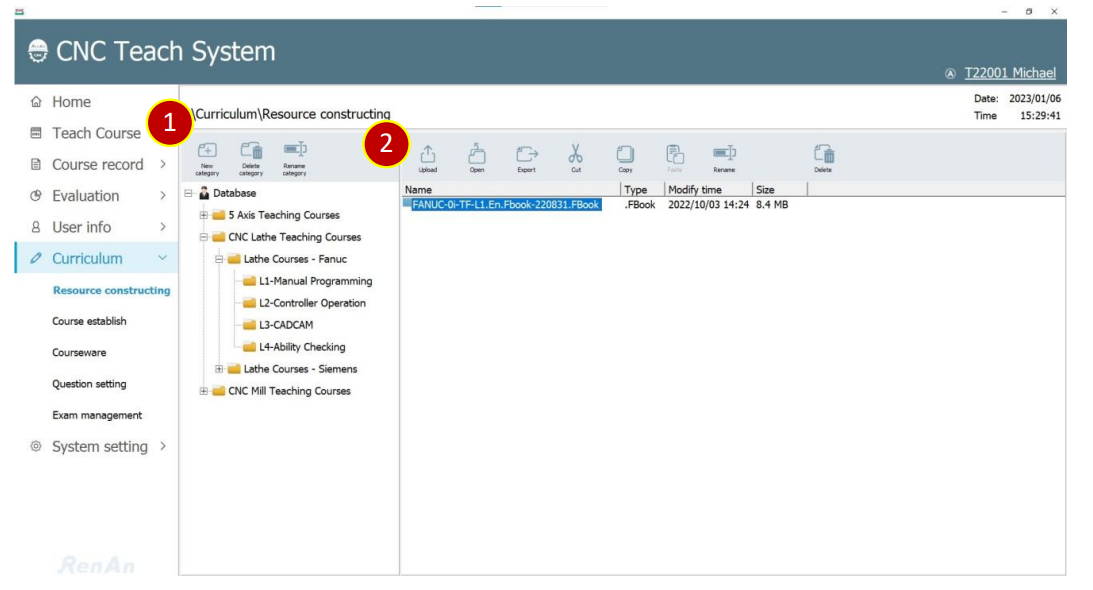
7.1 Resource Constructing
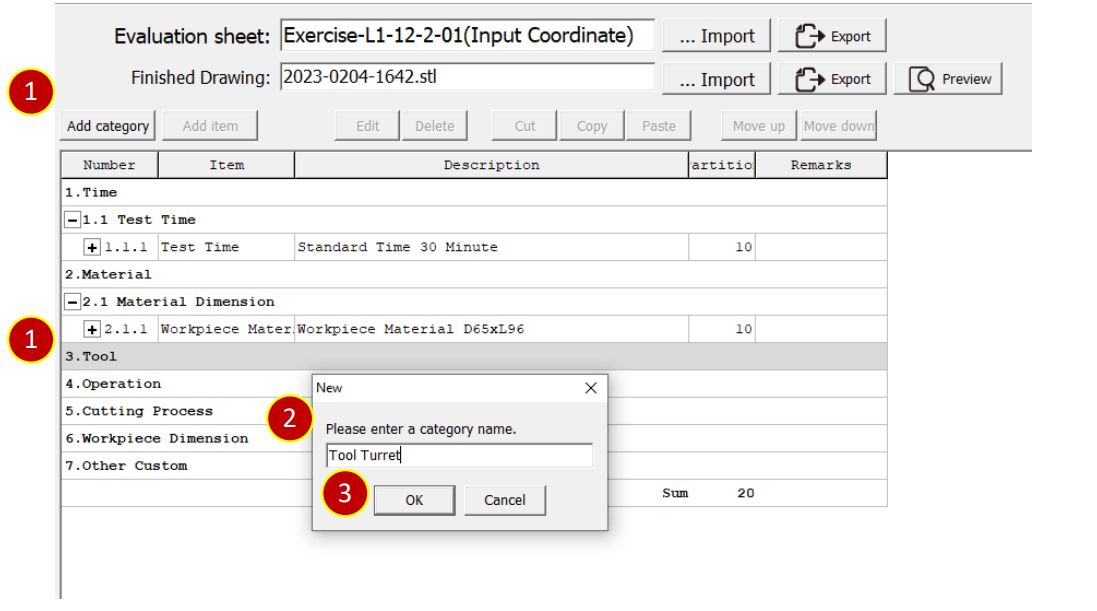
Upload Courseware, Teaching material, Working drawing to the database for
management. Plan and arrange in [Coureseware].

7.1.1 Category List:
Arrange resource list by tree Structure
(1) New category: Create a category folder in the currently selected category folder.
(2) Delete category: Delete the current selected category folder.
(3) Rename category: Rename the selected category folder.
7.1.2 Resource List
Show resource files in category folders
(1) Upload: Upload any type of file to the current category folder
(2) Open: Open the selected file with Windows default opening method.
(3) Export: Export the selected file to the machine
(4) Cut: Cut the selected file, and use [Paste] to move the file to another folder.
(5) Copy: Copy the selected file, use [Paste] to copy the file to other category folders.
(6) Paste: Paste the copied or cut file in the selected category
(7) Rename: Change the file name
(8) Delete: Delete the selected file
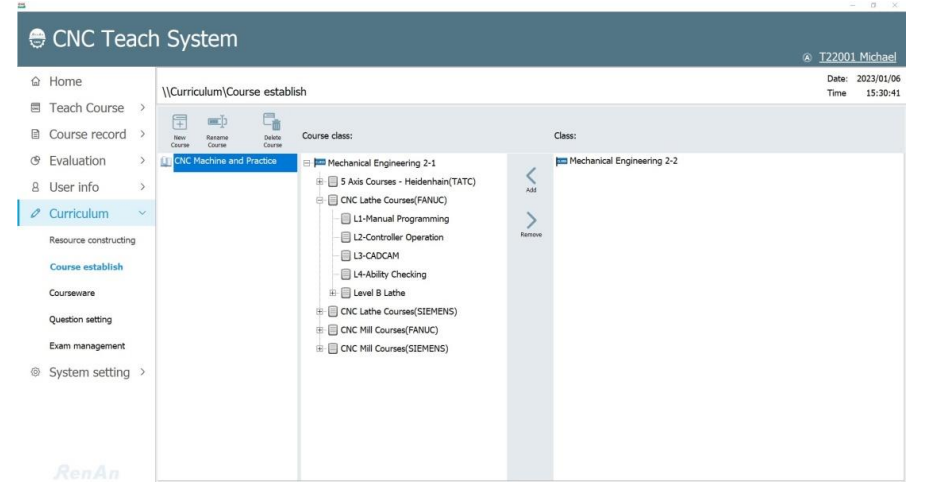
7.2 Course establish
Establish the course and add it to the course class
Build the chapter classification of the calss with [Course establish]
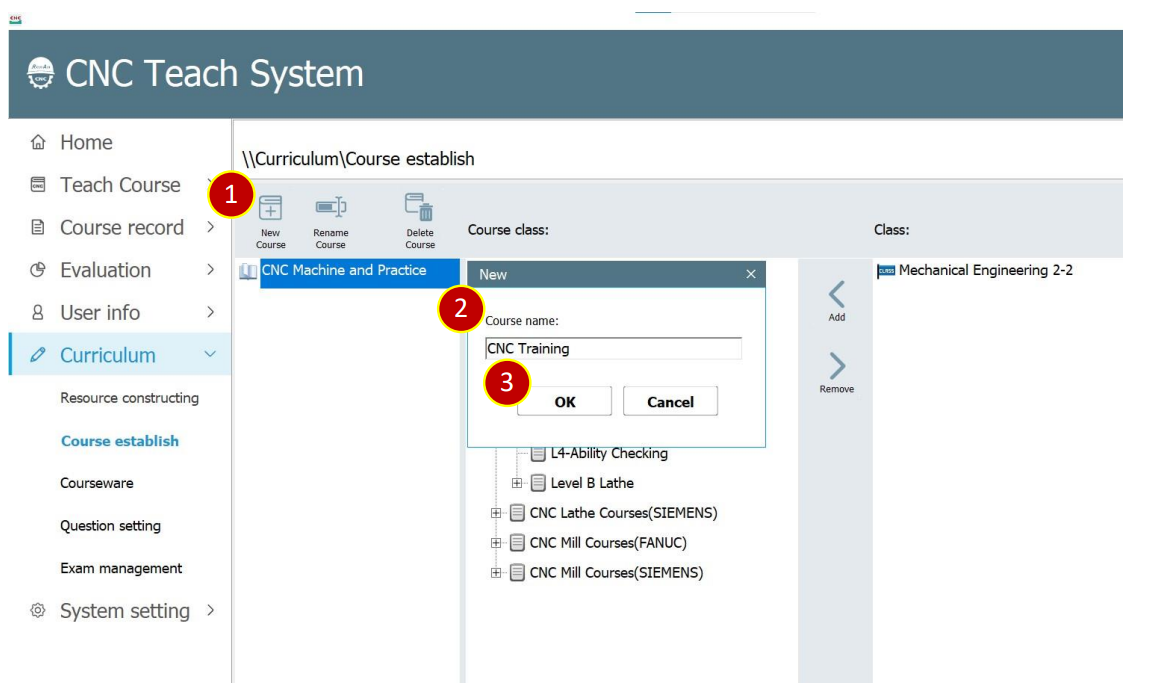
7.2.1 Add New Course
(1) Press [New Course]
(2) Key in the course name, eg., CNC Training
(3) Press [OK] to establish courses
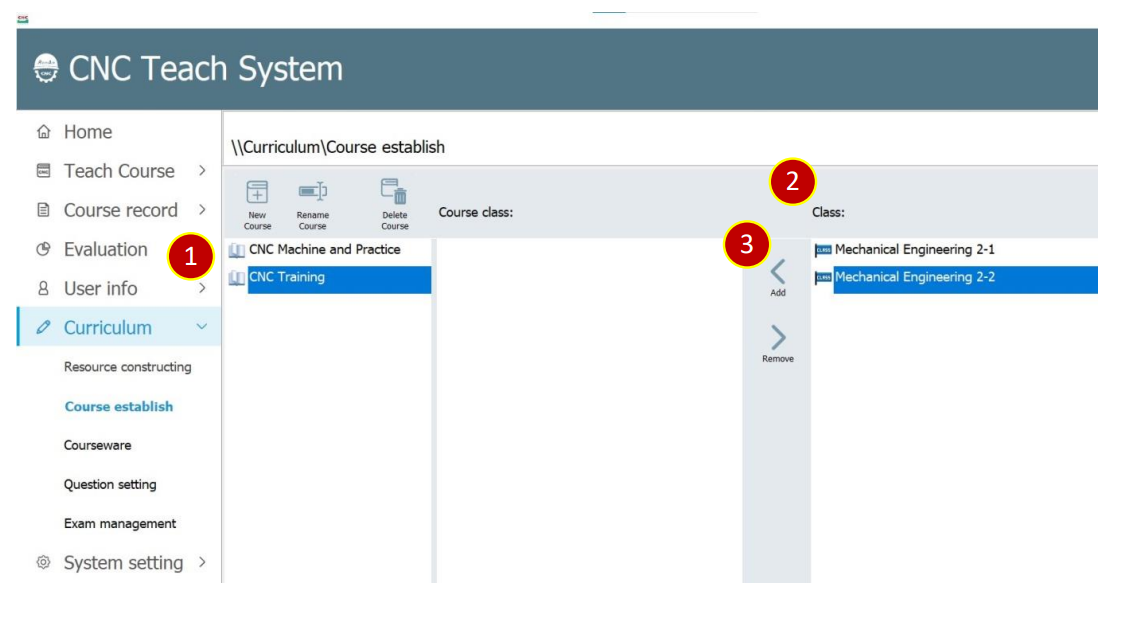
7.2.2 Add Class
(1) Select the class to be changed, e.g., CNC Training
(2) Select the calss you want to add from [Class], e.g., Mechanical Engineering 2-2
(3) Press [Add] to add the class to [Course Class]
7.3 Courseware
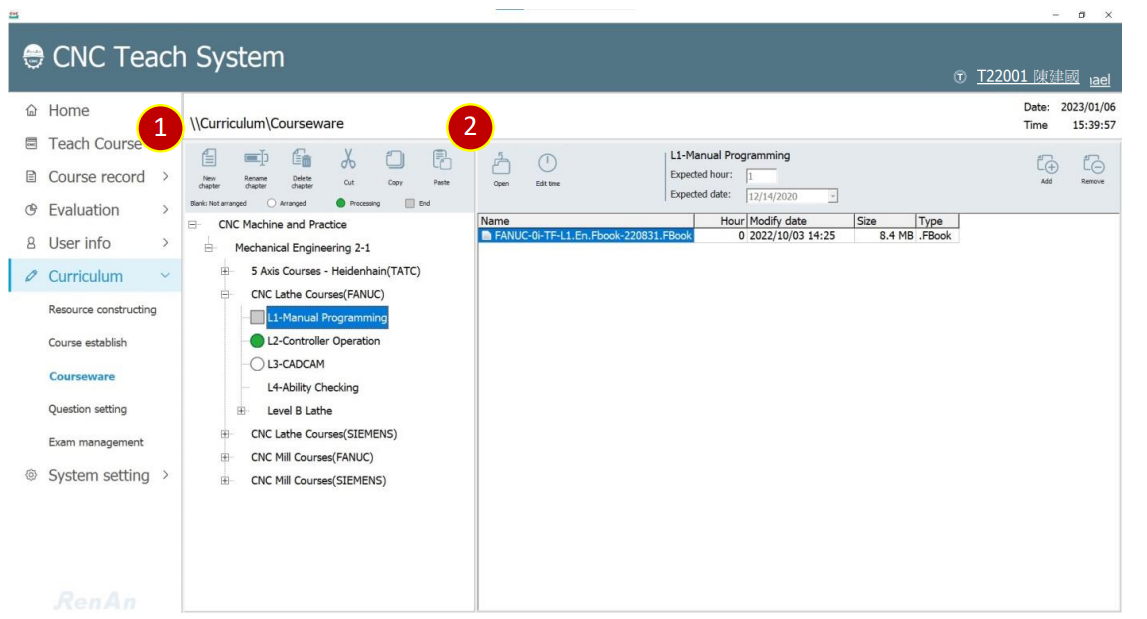
7.3.1 Chapter List
(1) New chapter: Add a new chapter folder in a class or chapter
(2) New chapter: Rename the chapter folder
(3) Delete chapter: Delete chapter folder
(4) Cut : Cut the selected chapter and use [Paste] to move to other chapter folders
(5) Copy: Copy the selected chapter and use [Paste] to copy it to other chapter folders
(6) Paste: Paste the copied or cut chapter in the selected chapter.
7.3.2 Chapter Content
(1) Open: Open the selected file with Windows default opening method.
(2) Edit Time: Edit the estimated date of class and the class hours and total
class hours of each courseware.
(3) Add: Add courseware files to the chapter.
(4) Remove: Remove the selected courseware file.
7.3.3 Add Courseware
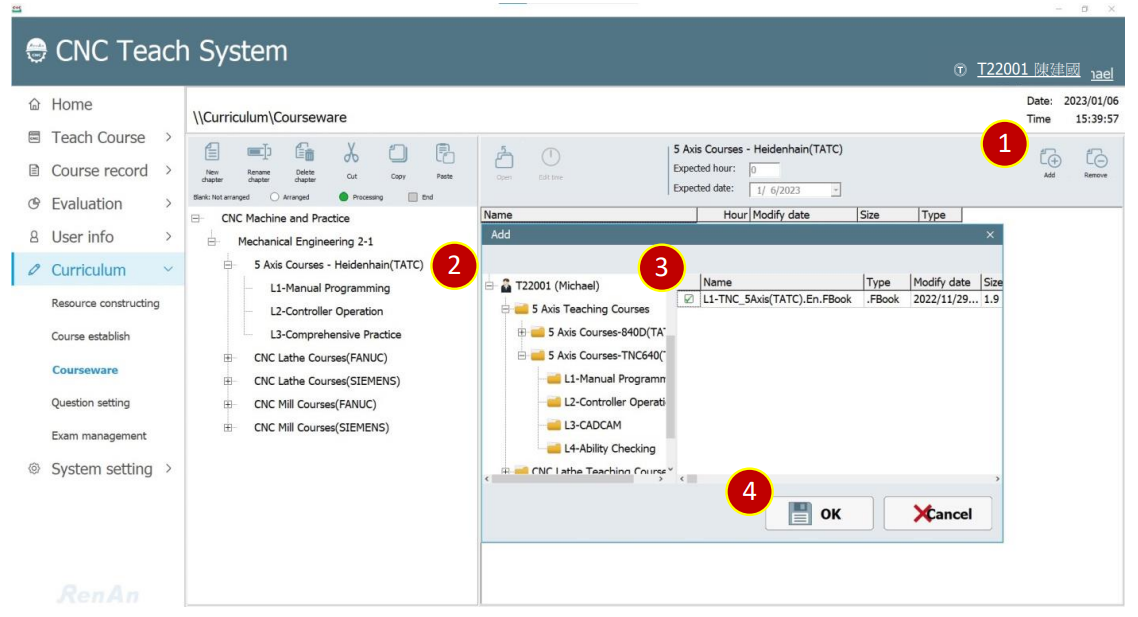
(1) Press [Add] at the selected chapter
(2) Select the account and category folder where the target file is located
(3) Check the add file
(4) Press [OK]
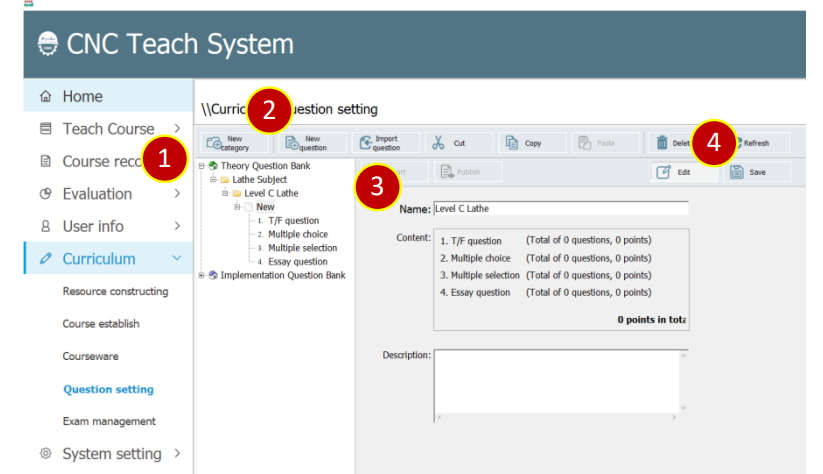
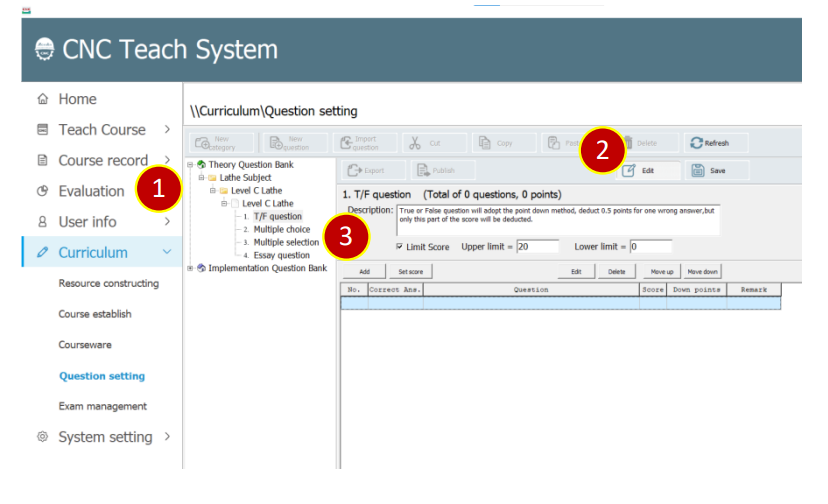
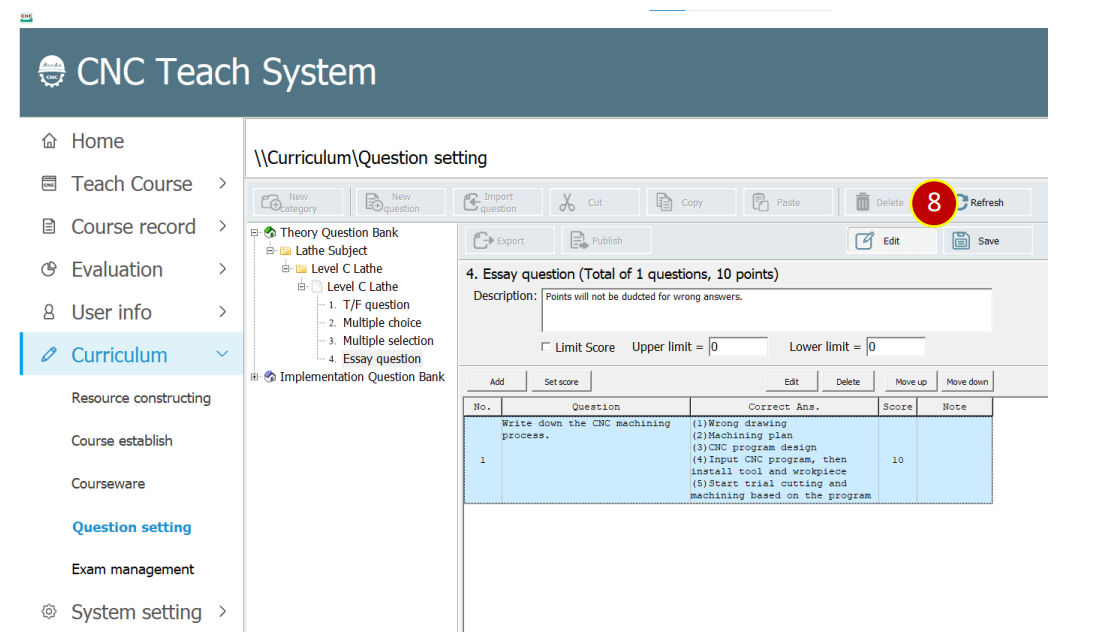
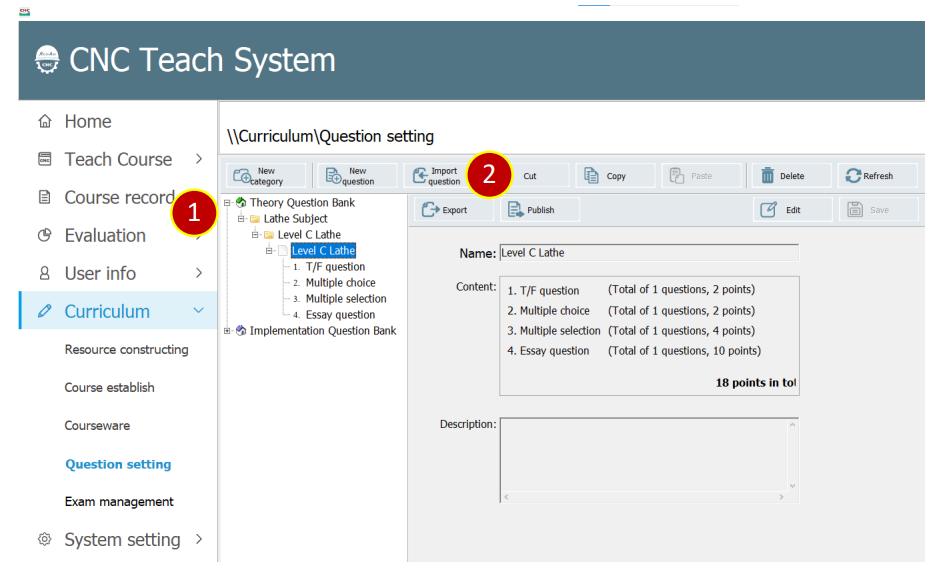
7.4 Question Setting (Theory Question Bank)
7.4.1 Add Question
(1) Select the category folder you want to add question.
(2) Press [New Question]
(3) Key in the name of the question , e.g., Level C Lathe
(4) Press [Save] to finish adding question
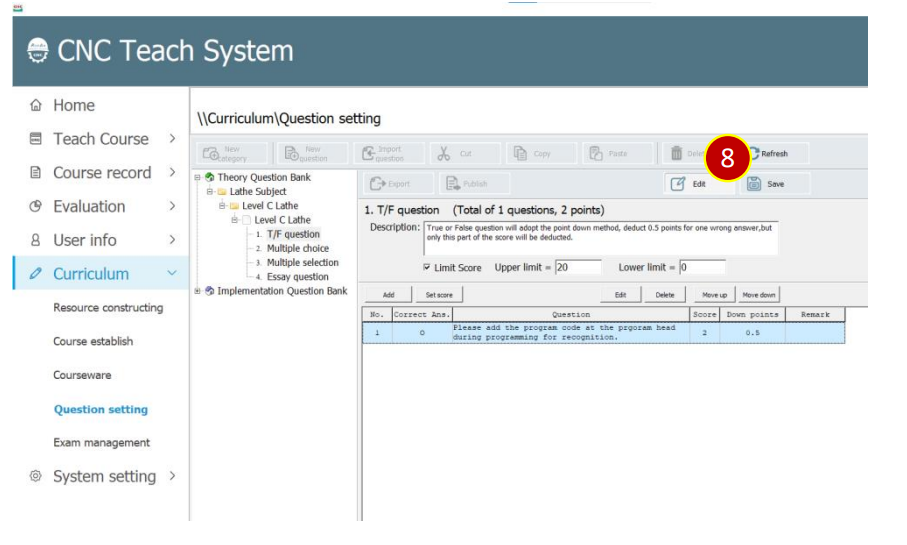
7.4.2 Add T/F question
(1) Select the T/F question you want to edit
(2) Press [Edit]
(3) Press [Add] to add the T/F question
(4) Set score and down points, e.g., Score 2, Down points 0.5.
(5) Key in the question content, click […] at right side to add picture.
(6) Select Anser
(7) Press [OK] to finish the setting of the T/F question.
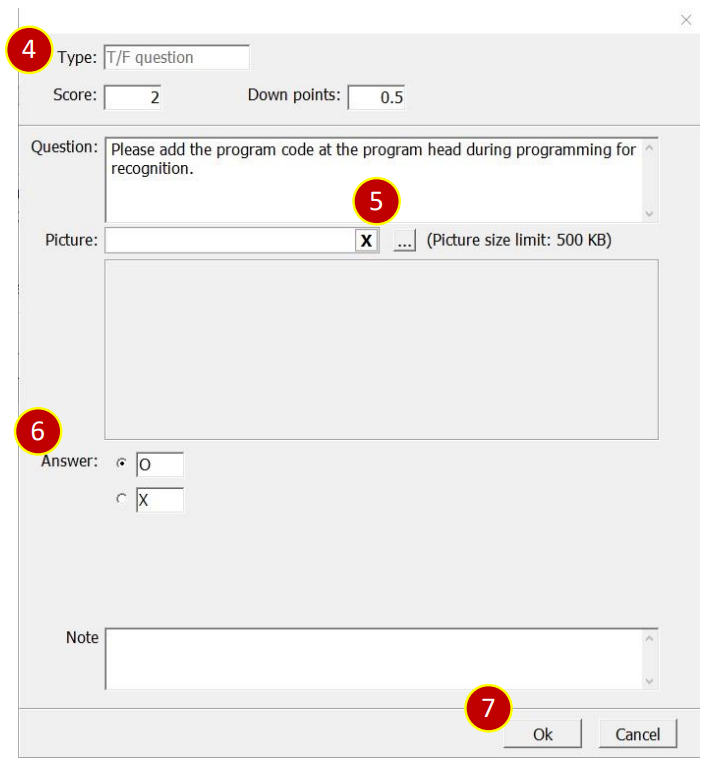
(8) Press [Save] to finish the editing of the T/F question
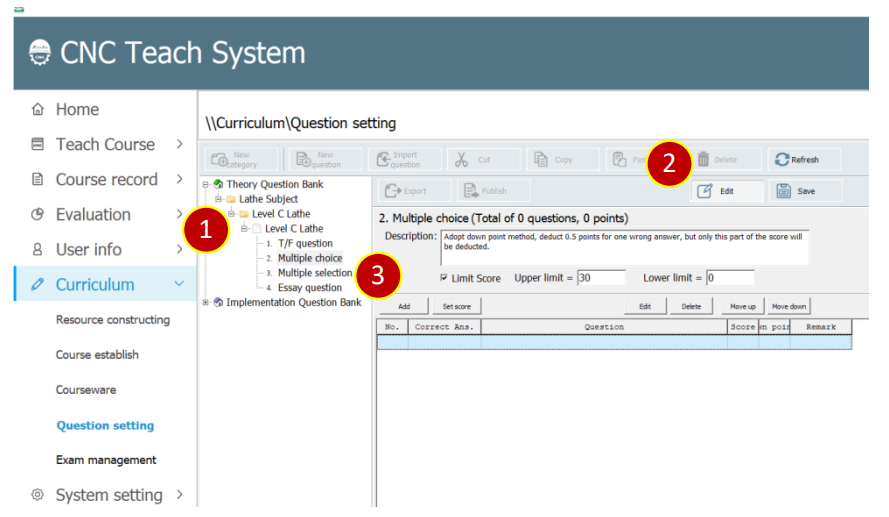
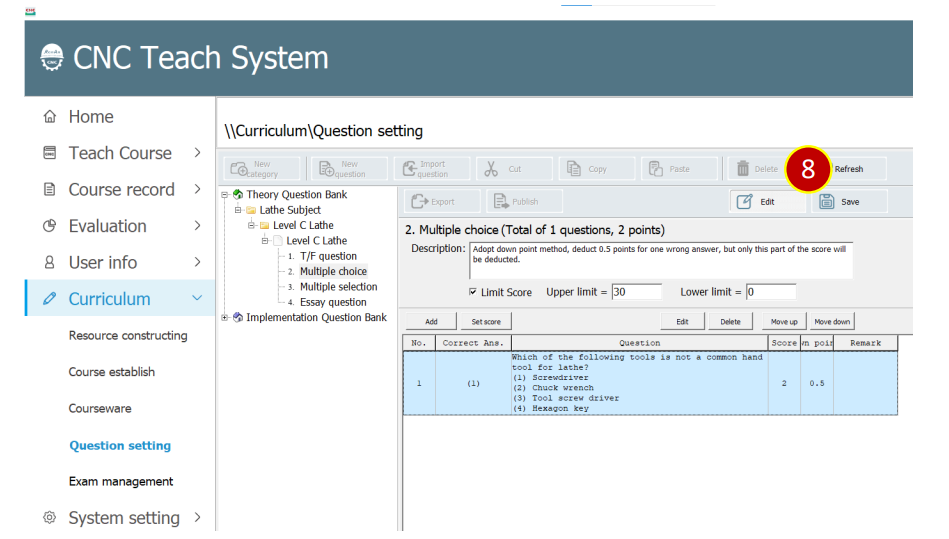
7.4.3 Add Multiple Choices
(1) Select the multiple choices you want to edit
(2) Press [Edit]
(3) Press [Add] to add multiple choice
(4) Set score and down points, e.g., Score 2, Down points 0.5
(5) Key in the question content, click […] at right side to add picture.
(6) Key in the answer option and check the answer
(7) Press [OK] to build the multiple choice
(8) Press [Save] to finish the edit of the multiple choice
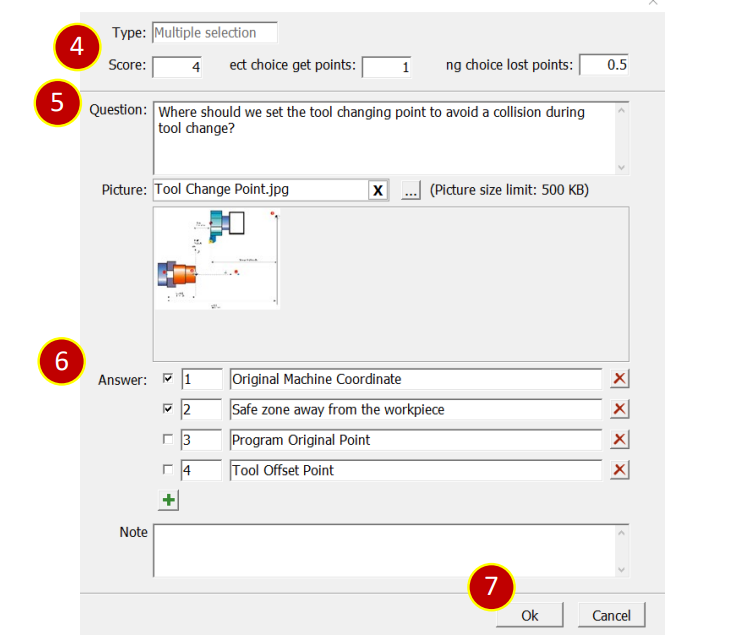
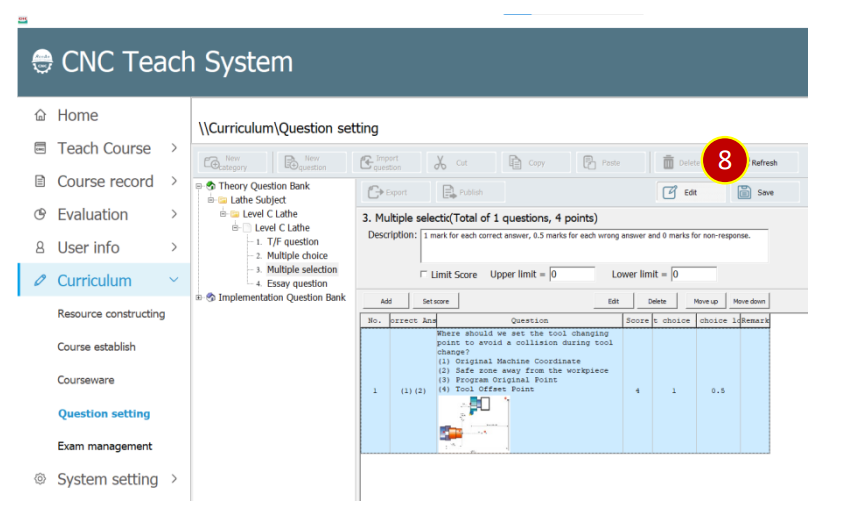
7.4.4 Add Multiple selection
(1) Select the multiple selection you want to edit
(2) Press [Edit]
(3) Press [Add] to add Muitiple selection
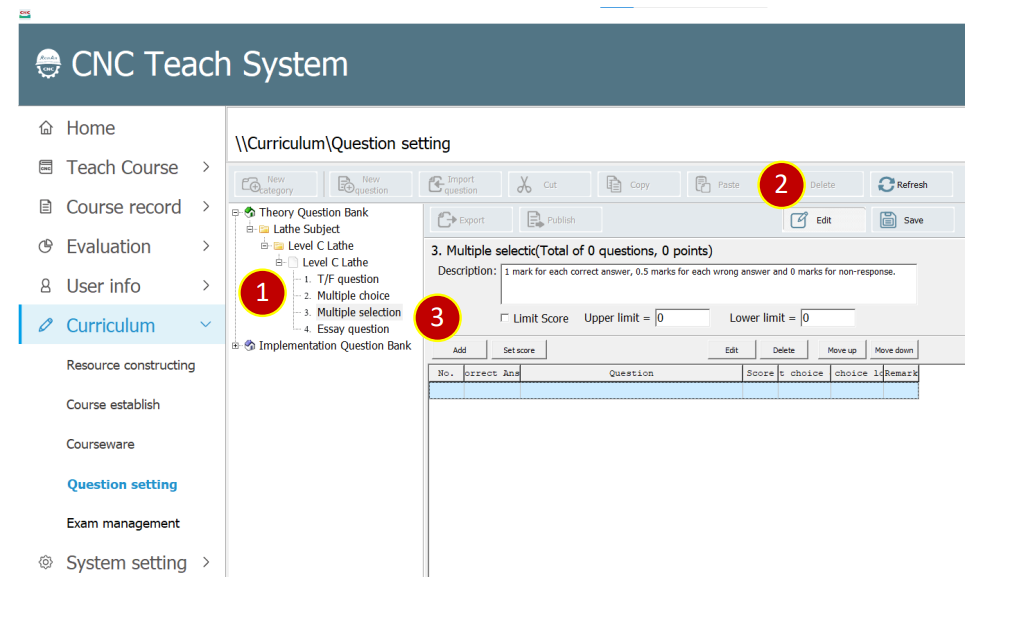
(4) Set score e.g., Score 4, 1 point for one correct anser, deduct 0.5 points for one wrong
answer.
(5) Key in the question content, click […] at right side to add picture.
(6) Key in the answer option and check the answer
(7) Press [OK] to build the multiple selection
(8) Press [Save] to complete the edition of the multiple selections.
7.4.5 Add Essay Question
(1) Select the essay question you want to edit
(2) Press [Edit]
(3) Press [Add] to add essay question
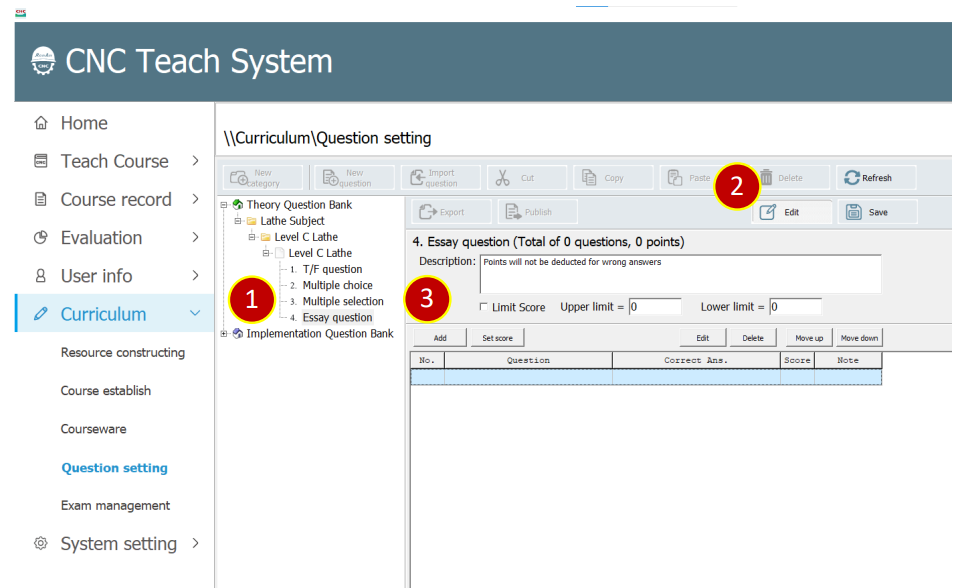
(4) Set score e.g., Score 10
(5) Key in the question content, click […] at right side to add picture.
(6) Key in the answer
(7) Press [OK] to build the esay question
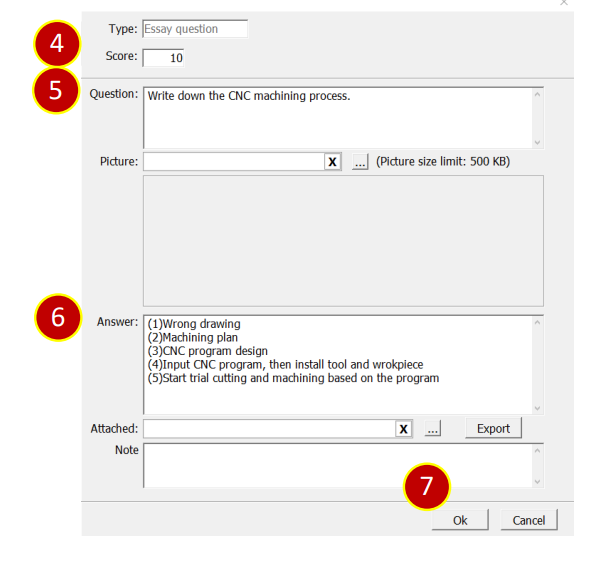
(8) Press [Save] to complete the edition of the essay question
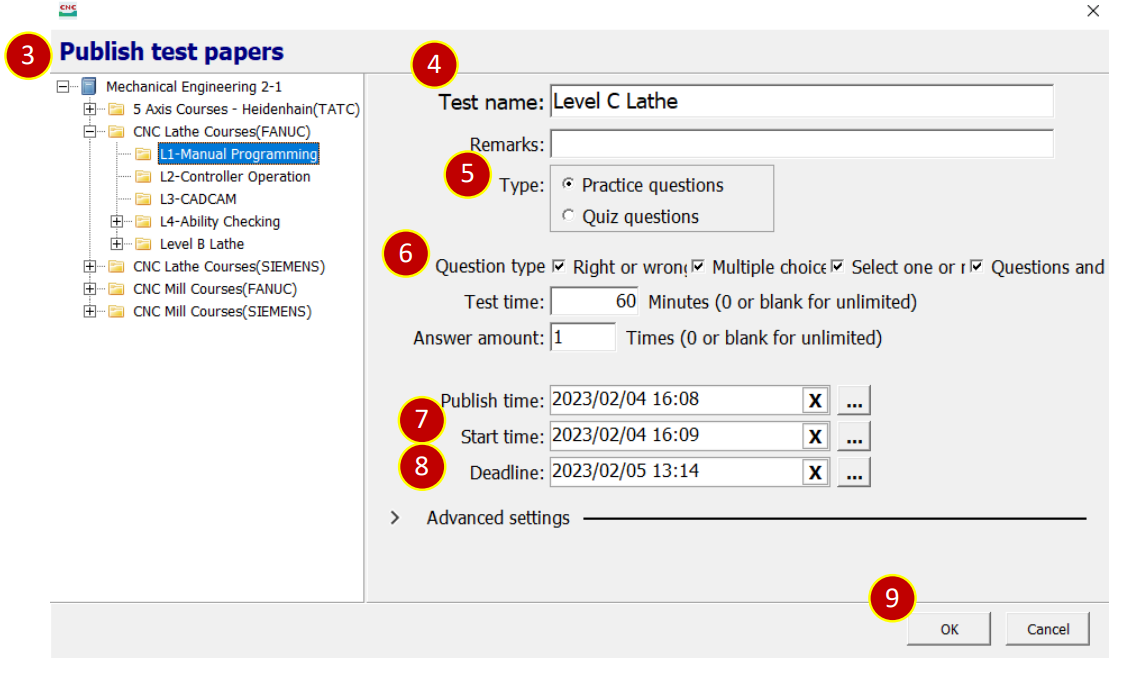
7.4.6 Test Publish
(1) Select the test you want to publish
(2) Press [Publish] to display the screen of the pulished test
(3) Select the publish place form the “Course Chapter”on the left side
(4) Set the name of the test
(5) Check the test type, e.g., Practice questions
(6) Set the test time and answer amount
(7) Press the […] at the right side of the start time to set the available time
(8) Press the […] at the right side of the deadline to set the submission time
(9) Press [OK] to complete the publishing of the test
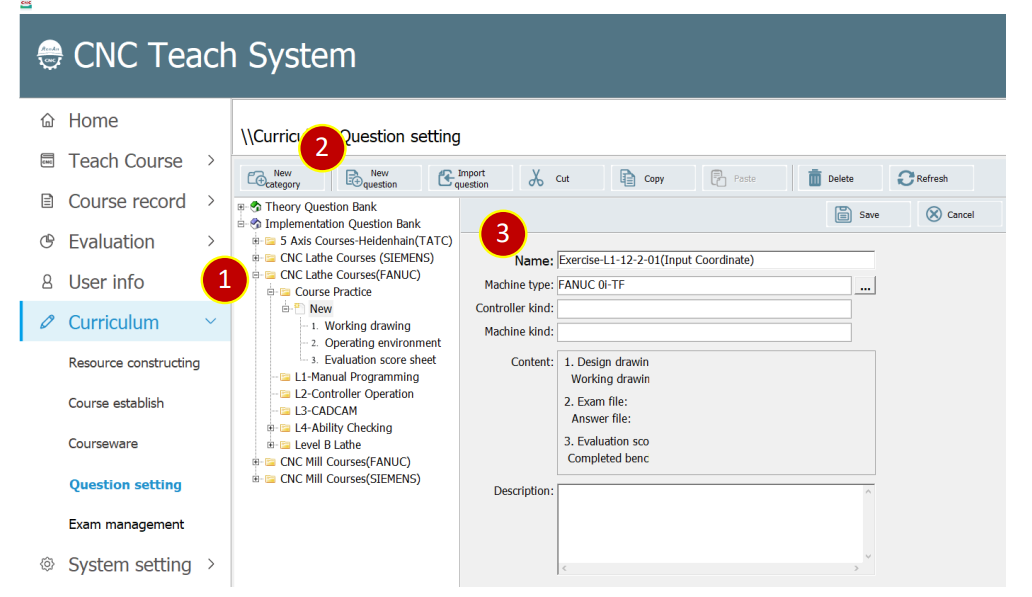
7.5 Question Setting (Practice Question Database)
7.5.1 Add Question
(1) Select the category folder you want to add e.g., Course Practice
(2) Press [New Question]
(3) Key in the question name e.g.,Exercise L1-12-2-01(Input Coordinate)
7.5.2 Add Question (Working drawing)
(1) Selec the [Working Drawing] in the question
(2) Press[…Import] at the right side of the Drawing (Image) to
select the working drawing

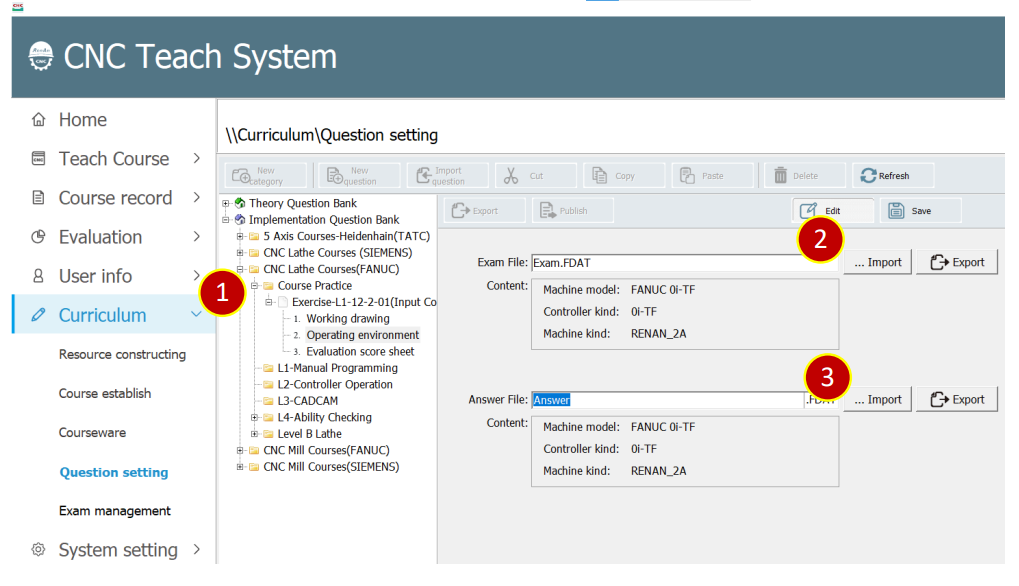
7.5.3 Add Question(Operating environment)
(1) Select the [2.Operating environment] in the question
(2) Press […Import] at the right side of the exam file to select an environment file to
automatically load when starting an exam
(3) Press […Import] at the right side of the answer file to select the answer environment to
compare with the test result
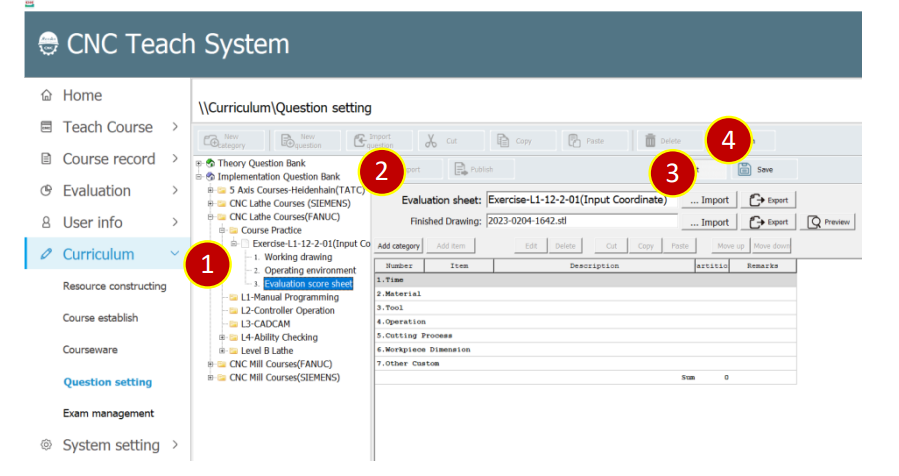
7.5.4 Add Question (Evaulation score sheet)(Basic setting)
(1) Select the [3. Evaulation score sheet] in the question
(2) Key in the name of the Evaulation score sheet, e.g.,Test time
(3) Press [Import] on the right side of the finished drawing to select the stl file of the
finished workpiece.
(4) Press [Save] to save the evaluation sheet after the setting of the evaluation sheet.
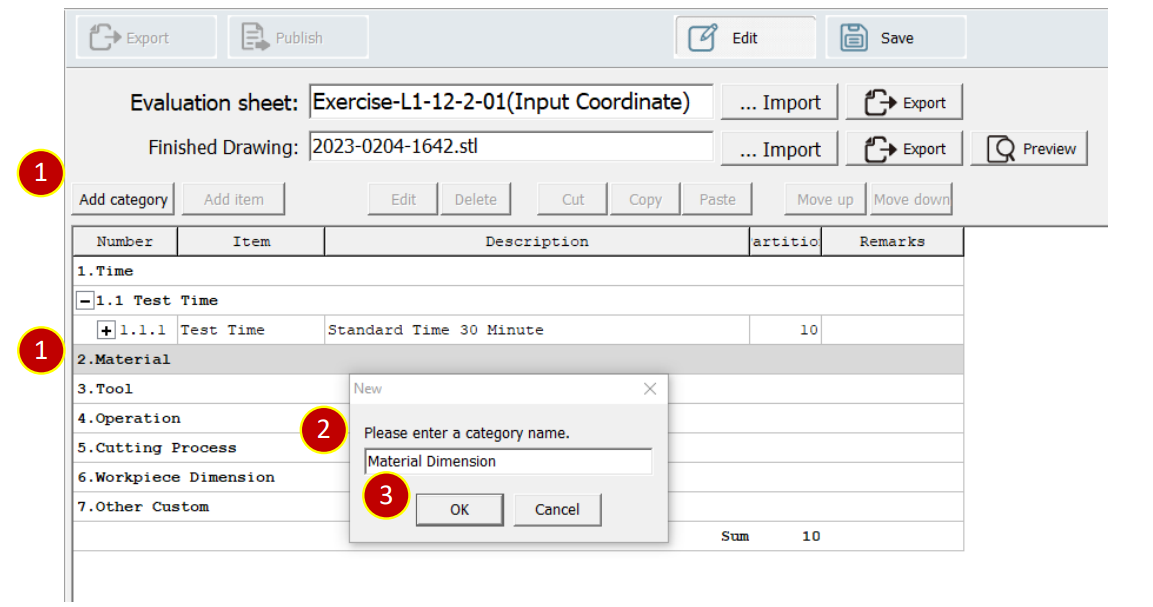
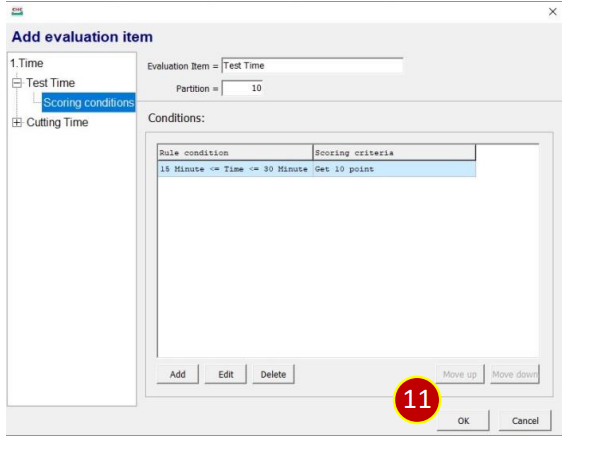
7.5.5 Add New Question(Evaulation Sheet)(Time)
(1) Select [1.Time], press[Add category]
(2) Key in the category name, e.g.,Test Time
(3) Press [OK]
(4) Select [1.1 Test Time], press [Add item]
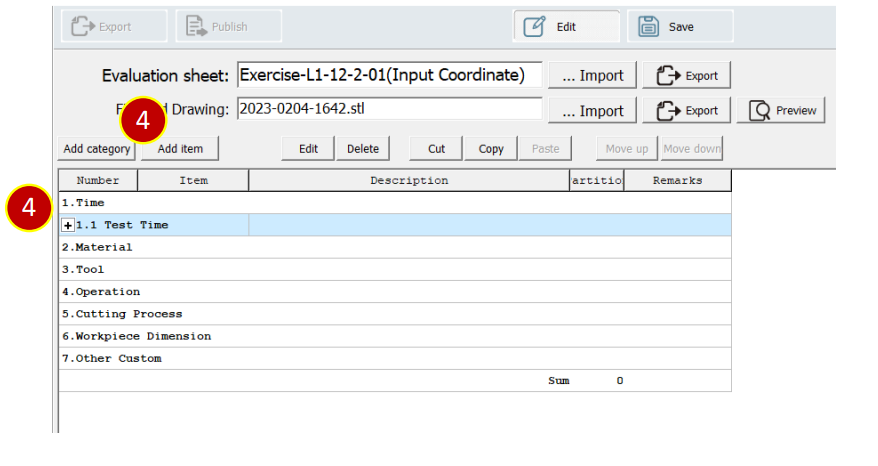
(5) Set Partition, e.g., 10
(6) Set Standard time, e.g., 30 Minute
(7) Select [Scoring conditions], press [Add] to add new scoring conditions
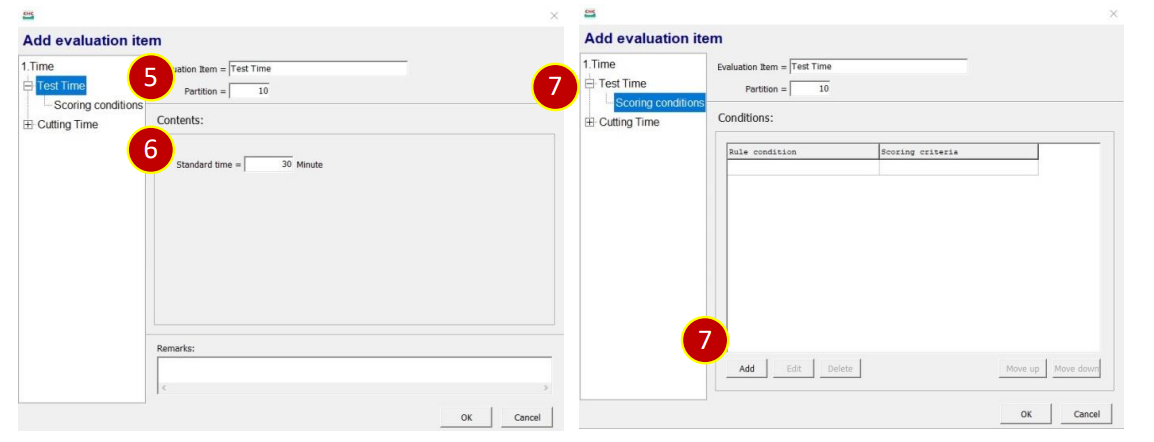
(8) Rule condition, the selection interval is between,
greater than > 15 minutes, less than <= 30 minutes
(9) Set scoring criteria, e.g., 10
(10) Press [OK] to finish the setting
(11) Press [OK] to finish the setting of the evaluation item
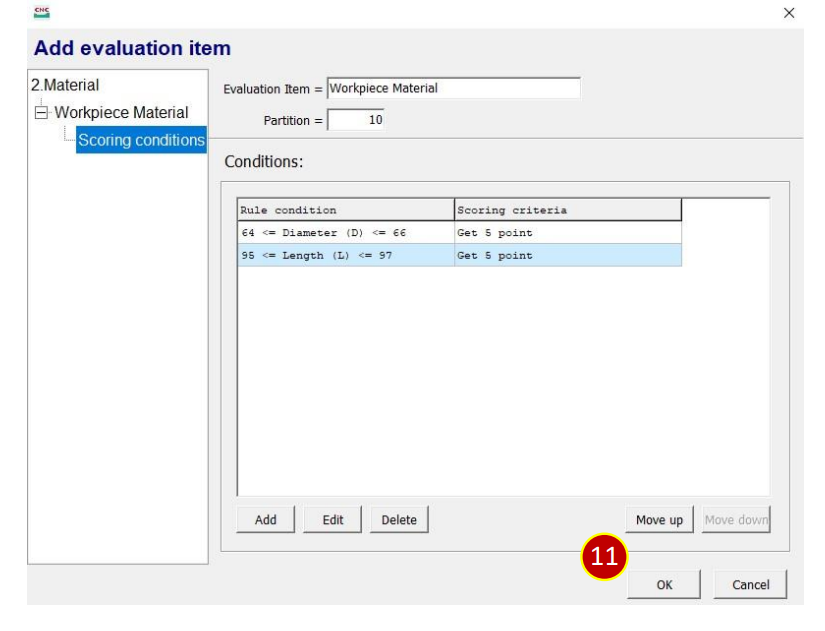
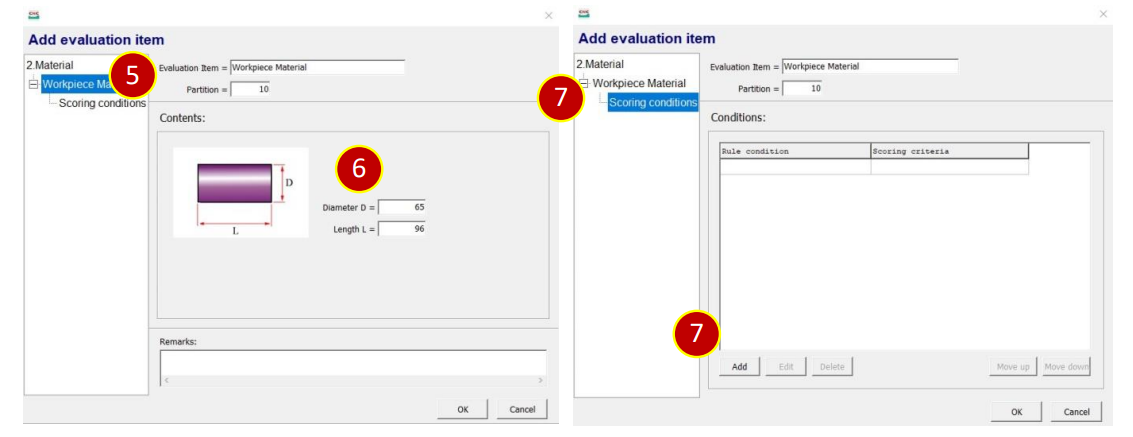
7.5.6 Add New Question(Evaulation Sheet)(Material)
(1) Select [2.Material], press [Add category]
(2) Key in the category name. e.g., Material Dimension
(3) Press [OK]
(4) Select [2.1 Material Dimension], press [Add item]

(5) Set partition, e.g., 10
(6) Set Diameter D and Length L, e.g., D = 65、L = 96
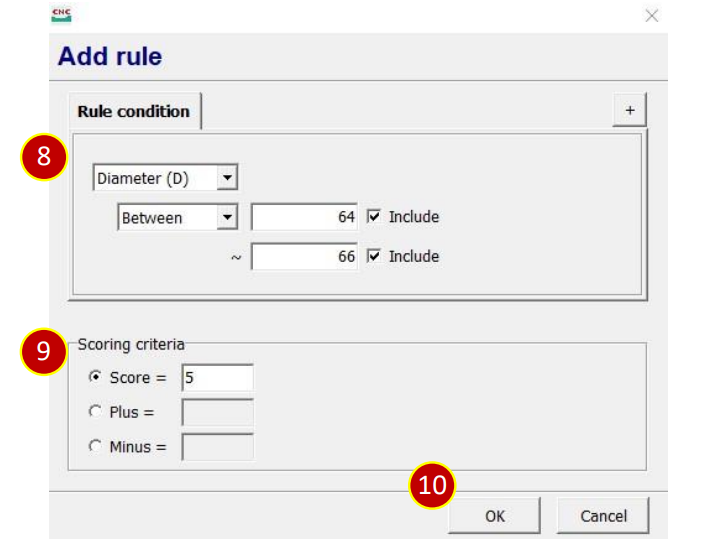
(7) Select [Scoring conditions], press [Add] to add new scoring conditions
(8) Add rule condition , select,
set Diameter, e.g., 64 ~ 66
(9) Set score, e.g., 5
(10) Press [OK] to finish the setting
(11) Add rule condition, select, set length, e.g., 95 ~ 97
(12) Set Score,e.g., 5
(13) Press [OK], to finish the setting.
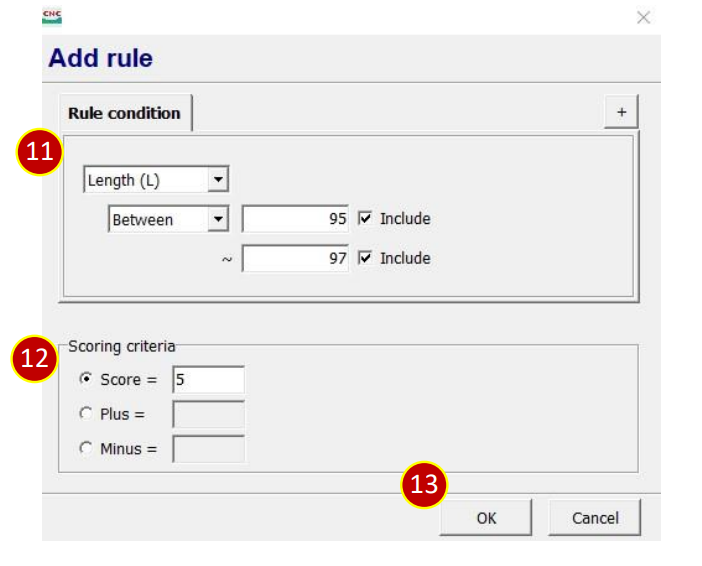
(14) Press [OK], to finish the setting of the evaluation item
7.5.7 Add New Question(Evaulation Sheet)(Material)
(1) Select [3.Tool], press [Add category]
(2) Key in the category name. e.g., Tool Turret
(3) Press [OK]
(4) Select [3.1 Tool Turret], press [Add item]
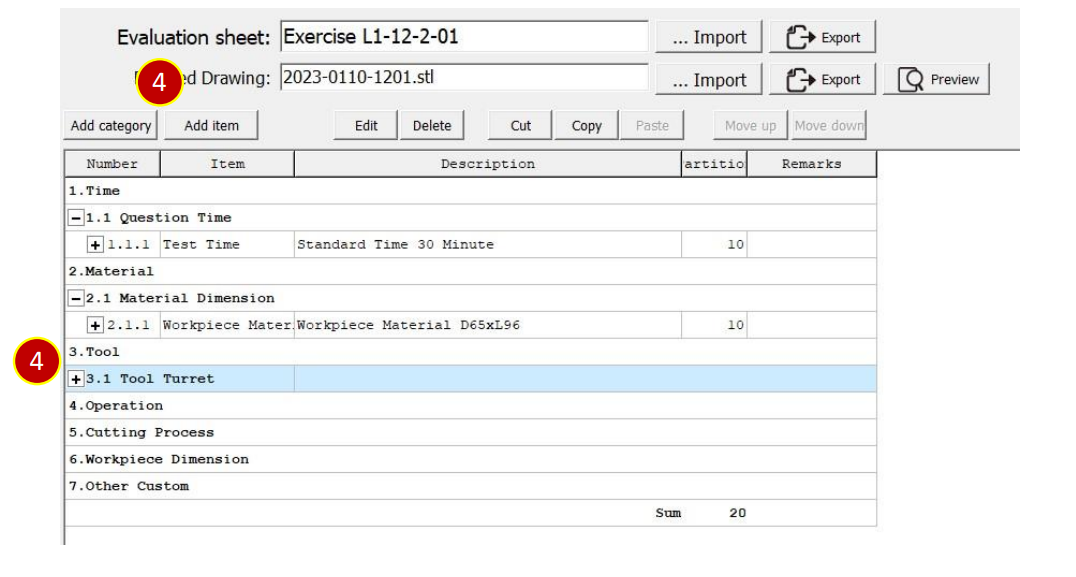
(5) Set Partition, e.g., 10
(6) Set Tool number T、Tool Type、Tool nose radius R, e.g., T = 1、Type=Rhombus-80、
R = 0.8
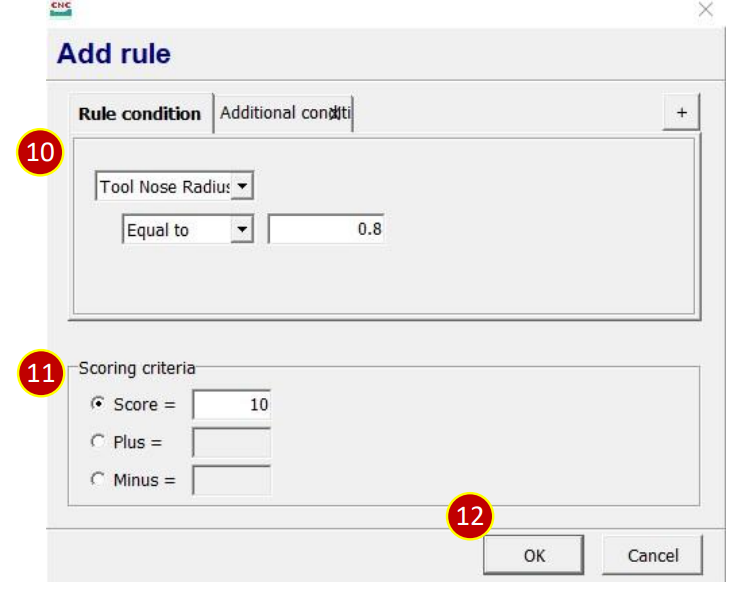
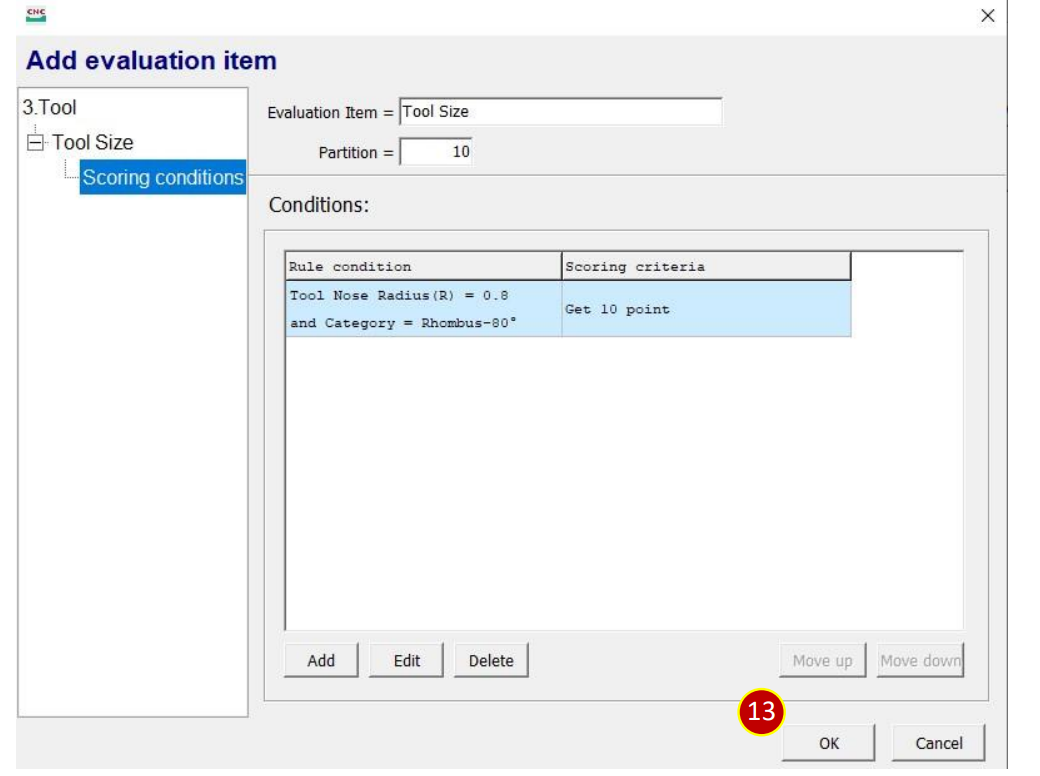
(7) Select [Scoring conditions], press [Add] to add scoring conditions
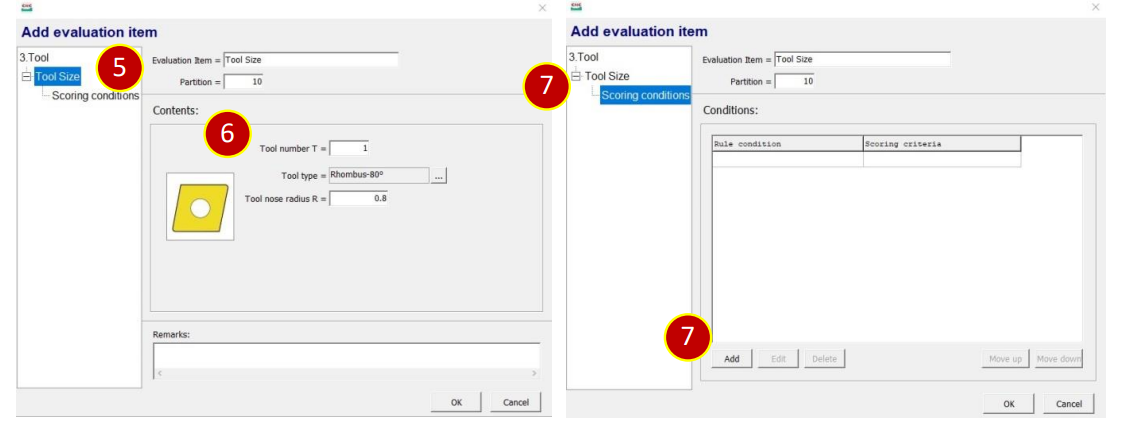
(8) Add rule condition, e.g.,Rhombus-80
(9) Press [+] to add additional conditions

(10) Additional conditions, select , select , set
radius R, e.g., 0.8
(11) Set Score,e.g., 10
(12) Press [OK], to finish the setting
(13) Press [OK], to finish the setting of the evaluation item
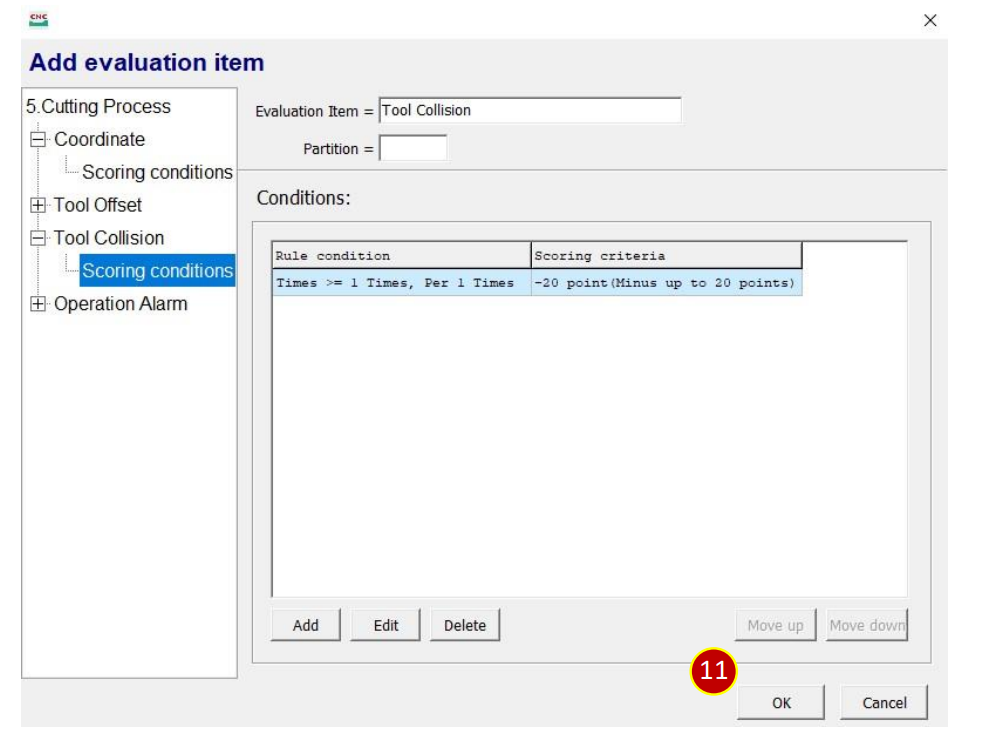
7.5.8 Add New Question(Evaulation Sheet)(Cutting Process)(Tool Collision)
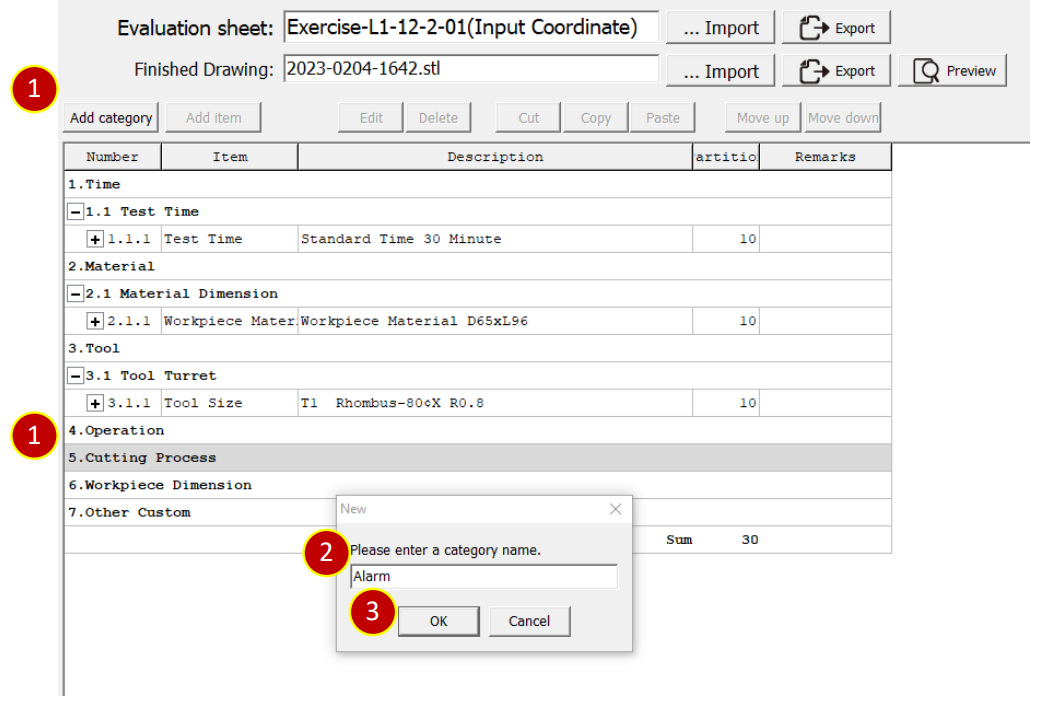
(1) Select [5.Cutting Process], press [Add category]
(2) Key in the category name. e.g., Alarm
(3) Press [OK]
(4) Select [5.1 Alarm], press [Add item]
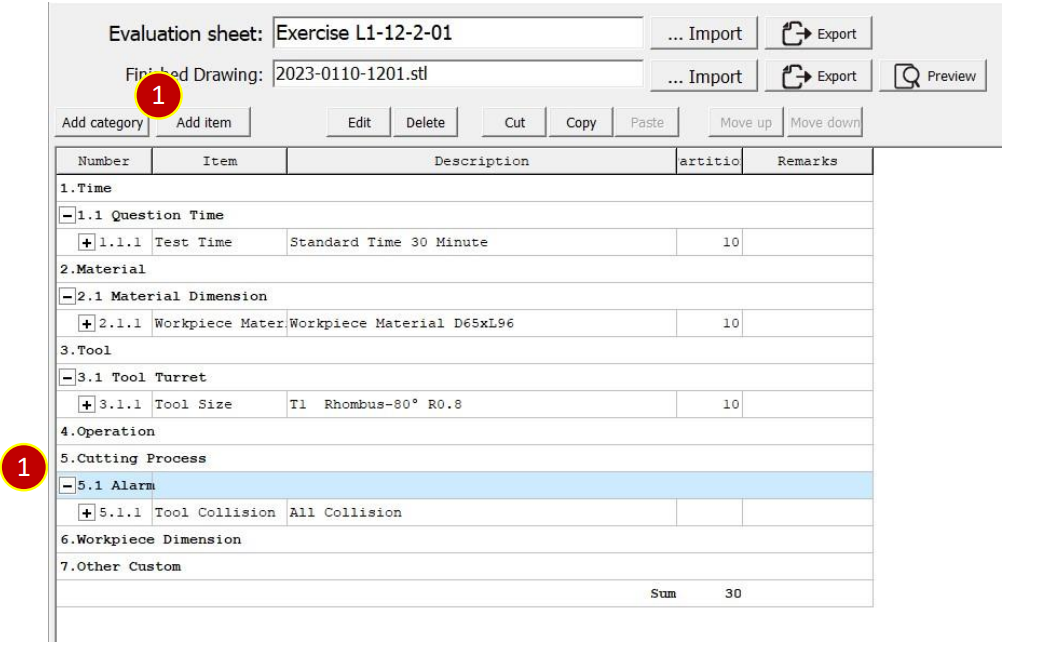
(5) Select [Tool Collision], and check[All collisions]
(6) Select [Scoring conditions], press [Add] to add scoring conditions
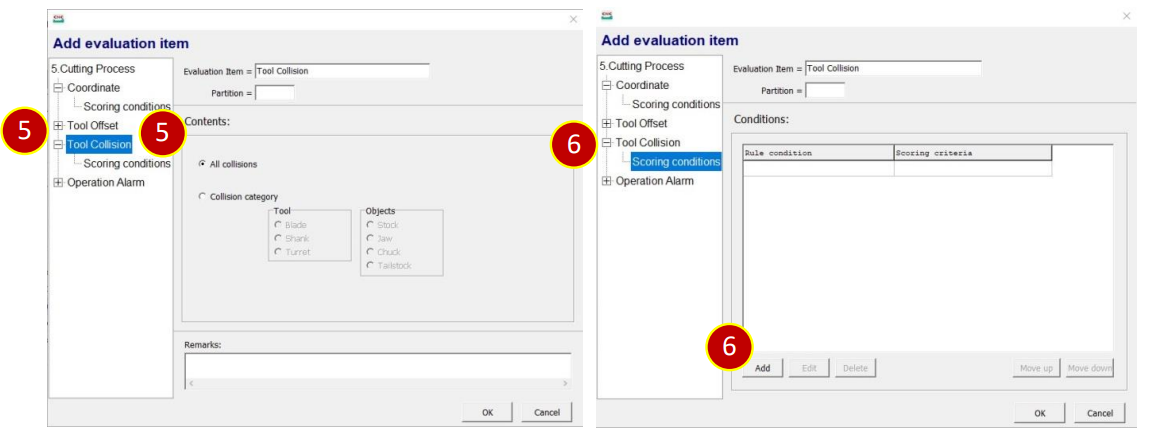
(7) Add rule condition , select , set 1 time
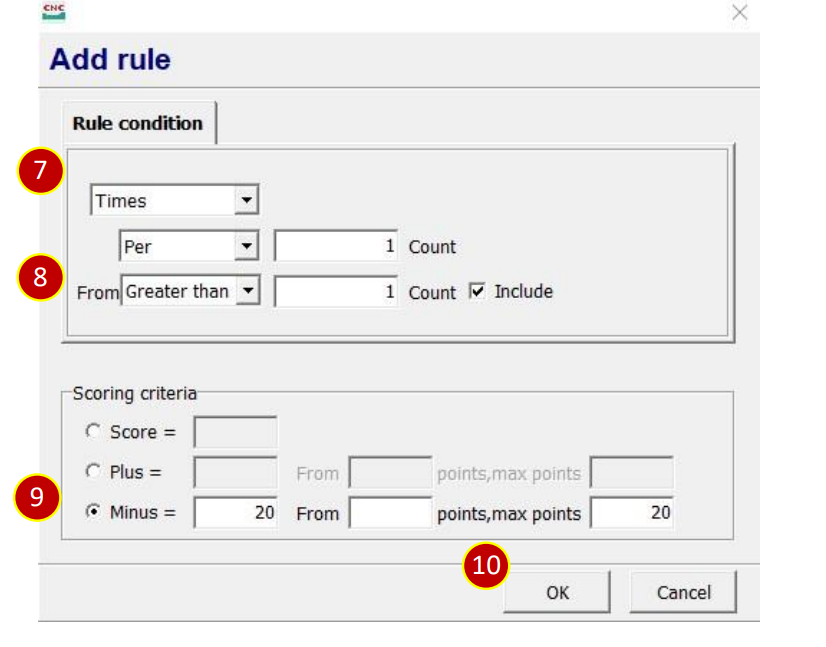
(8) Set and set 1 time (V include)
(9) Scoring criteria, check [Minus], set deduction, e.g., 20, maxium deduct 20 points
(10) Press [OK], to finish the setting
(11) Press [OK], to finish the setting of the evaluation item
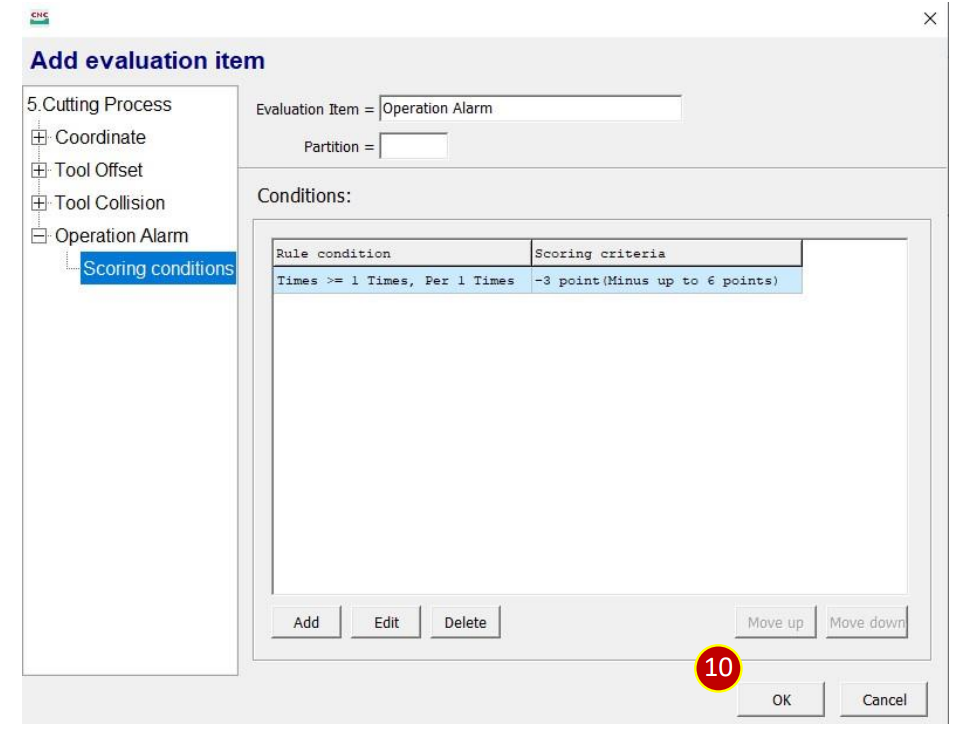
7.5.9 Add New Question(Evaulation Sheet)(Cutting Process)(Tool Collision)
(1) Select [5.1 Alarm], and press [Add item]
(2) Select [Operation Alarm]
(3) Check [All operation alarms]
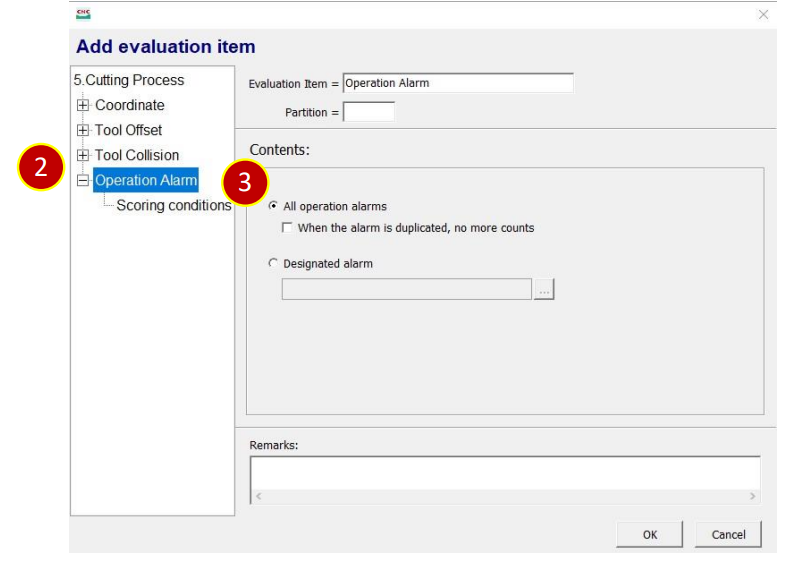
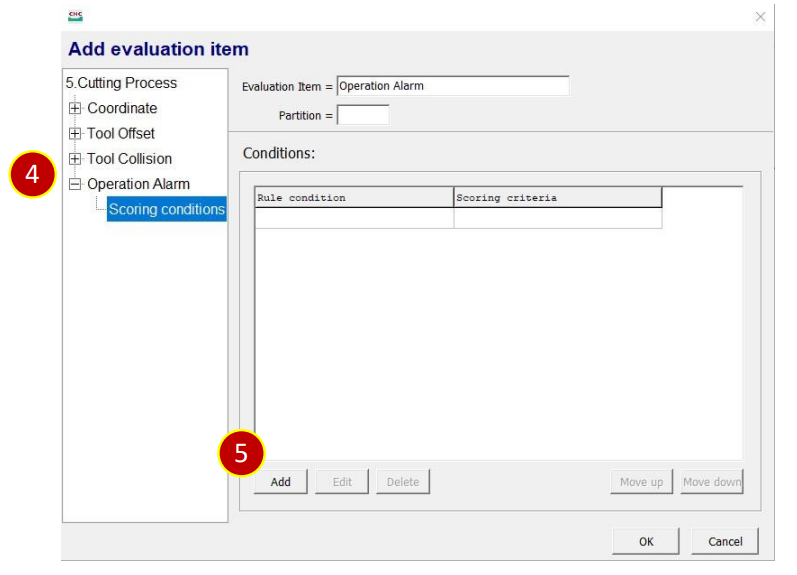
(4) Select [Scoring conditions]
(5) Press [Add] to add scoring conditions
(6) Add rule condition , select , set 1 time.
(7) Set , set 1 time (V include )
(8) Scoring criteria, check [Minus], set deduction,e.g., 3, maxium deduct 6 points
(9) Press [OK], to finish setting
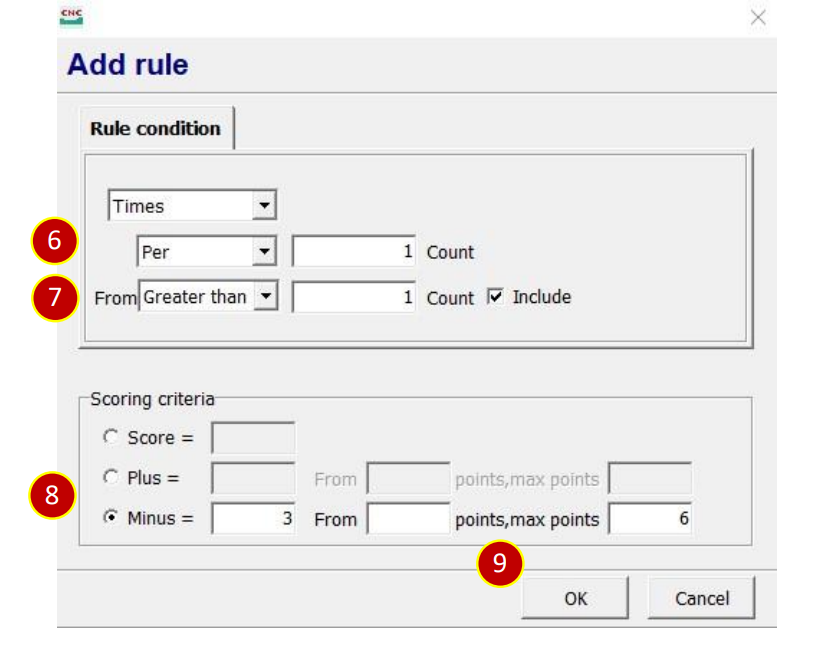
(10) Press [OK], to finish the setting of the evaluation item
7.5.10 Add New Question(Evaulation Sheet)(Workpiece Dimension)
(1) Select [6.Workpiece Dimension], press [Add category]
(2) Key in the category name. e.g., Dimension Measurement
(3) Press [OK]
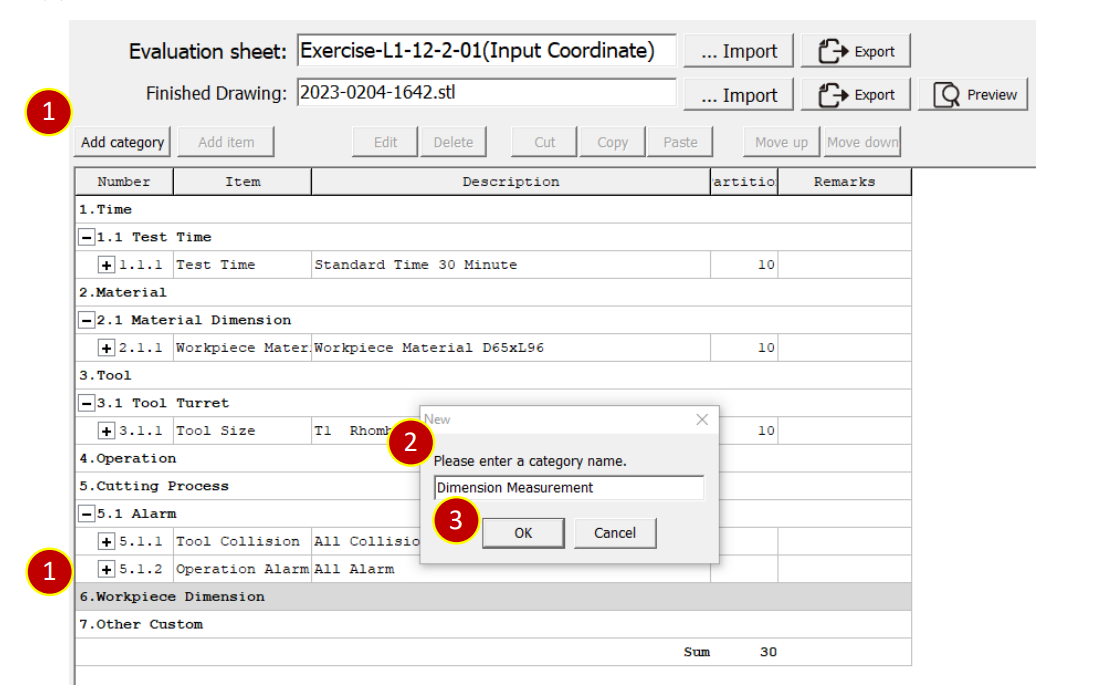
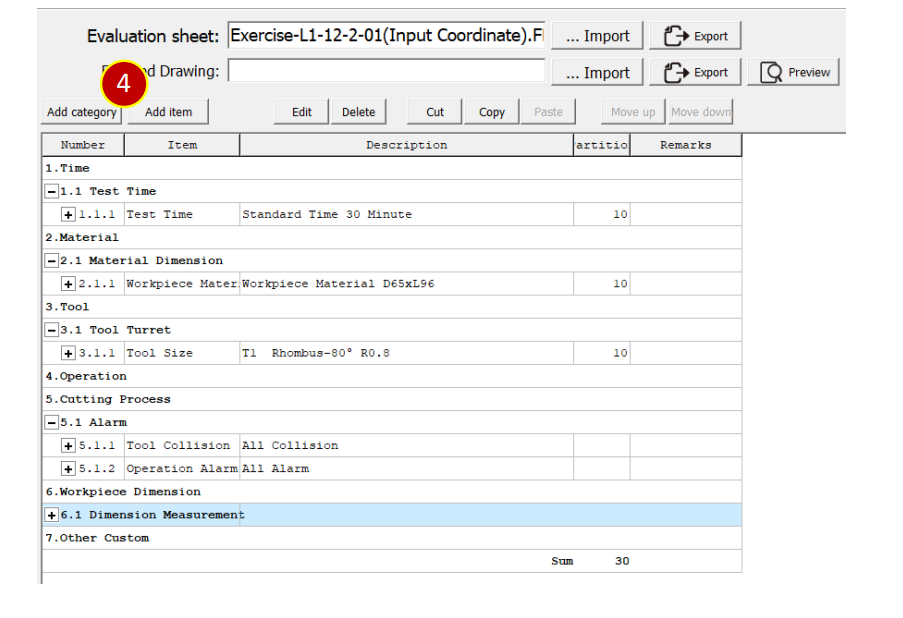
(4) Select [6.1Dimension Measurement], press [Add item]
(5) Select [Turning 2Axis]> [Diameter], set partition, e.g., 10
(6) Set Diameter and Radius, e.g.,Diameter = 42、Tolerance = ±0.1
(7) Select [Scoring Condition], press [Add] to add scoring condition
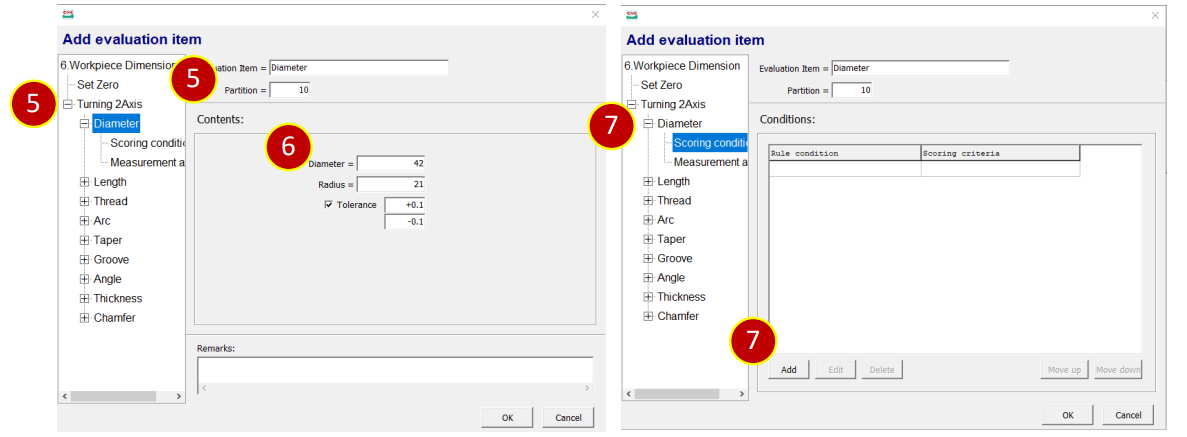
(8) Add rule condition , select , set Diameter, e.g., 41.9 ~ 42.1
(9) Set Score, e.g., 10 points
(10) Set [OK] to finish the setting
(11) Select [Measurement action]
(12) Use [(Mouse Right Key)] , click the position you would like to measure.
(13) Press [OK], to finish the setting of the evaluation items.
7.5.11 Add New Question(Evaulation Sheet)(External Thread)
(1) Select [6.Workpiece Dimension], add and select [Dimension(External Thread)]
(2) Press [Add item]
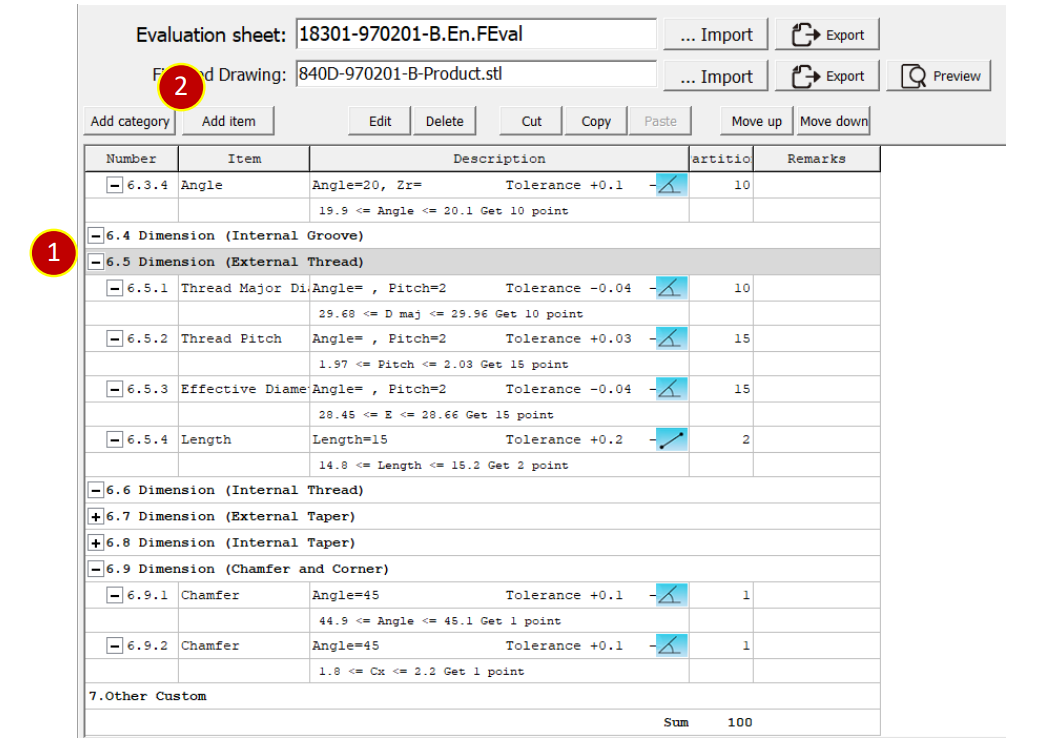
(3) Select [Turning 2Axis] > [Thread], set[Evaulation Item], key in Thread
(4) Set partition, e.g., 15 points
(5) Set Pitch、Pitch diameter and External Diameter,
e.g.,Pitch= 2、Pitch diameter= 28.7
(6) Check and set toleranc, e.g., -0.04 to -0.25
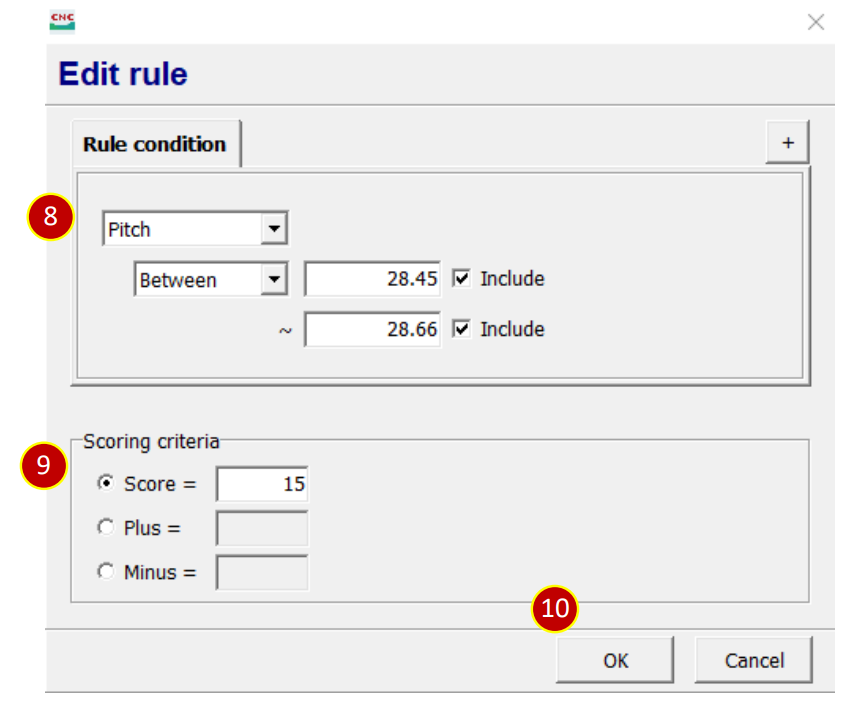
(7) Select [Scoring condition], press [Add] to add new scoring condition
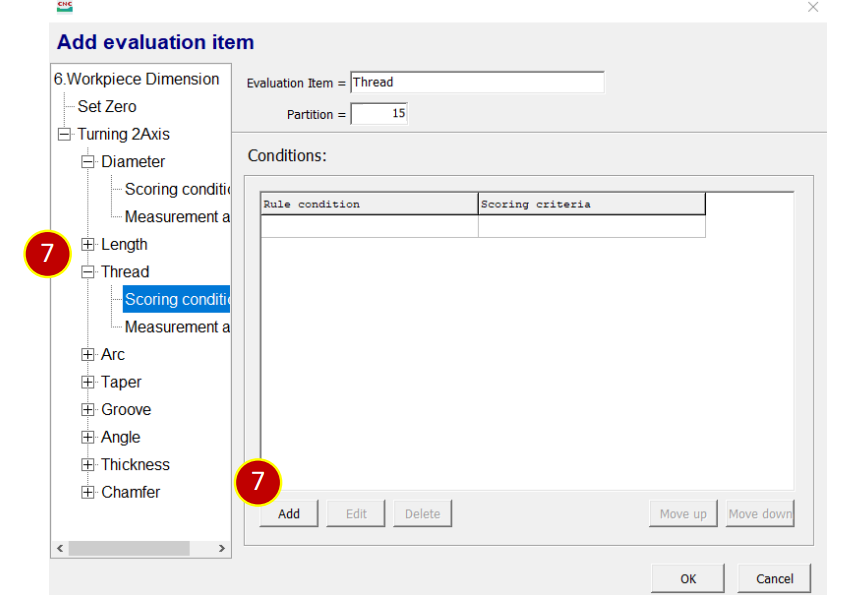
(8) Add rule condition , select , set diameter, e.g., 28.45 ~ 28.66
(9) Set Score, e.g., 15 points
(10) Press [OK], finish the setting
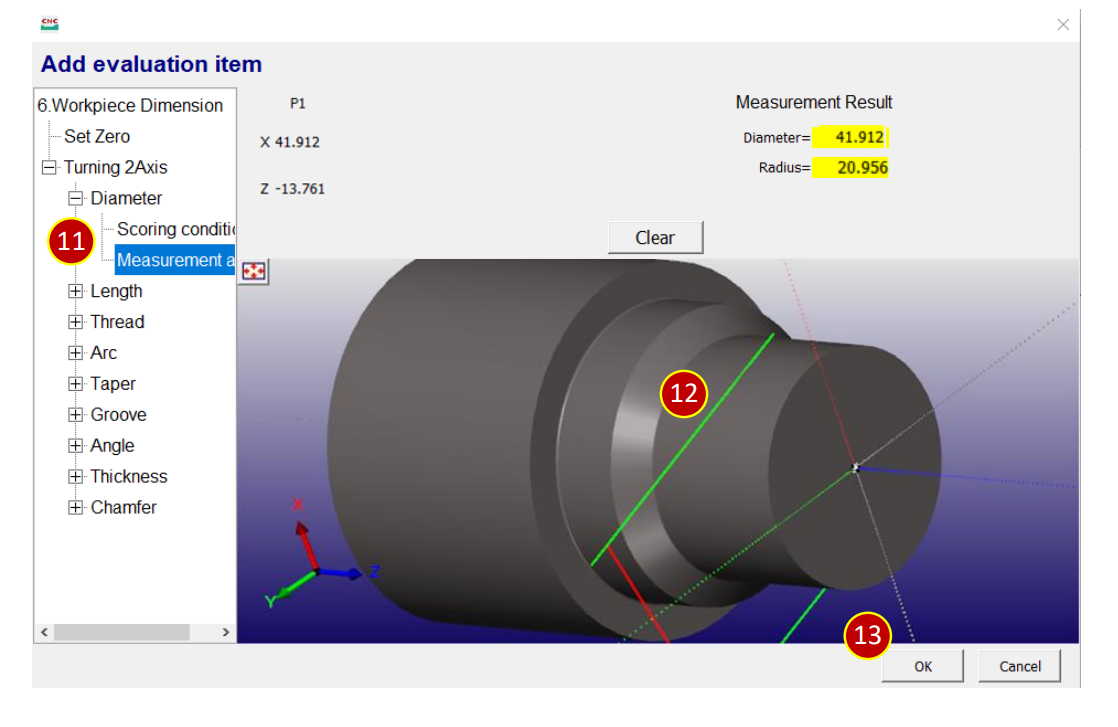
(11) Select [Measurement action]
(12) Use [(Mouse Right Key)], click the position you would like to measure.
(13) Press [OK], to finish the setting of the evaluation items.

7.6 Exam management
7.6.1 Course Chapter
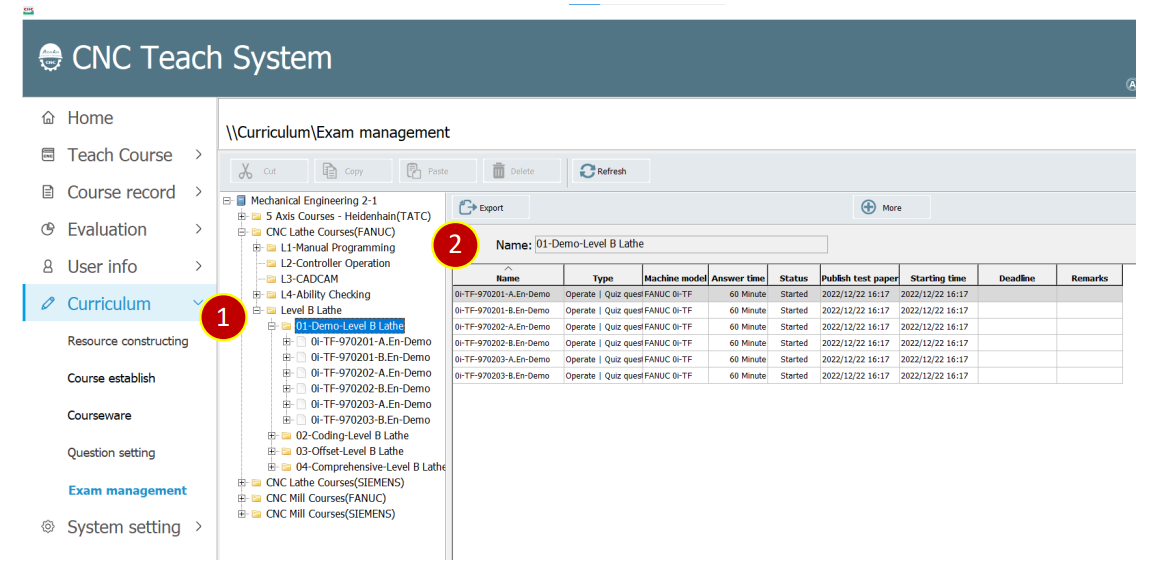
(1) Select the file category of the course chapter
(2) Show the test status in the folder
7.6.2 Test
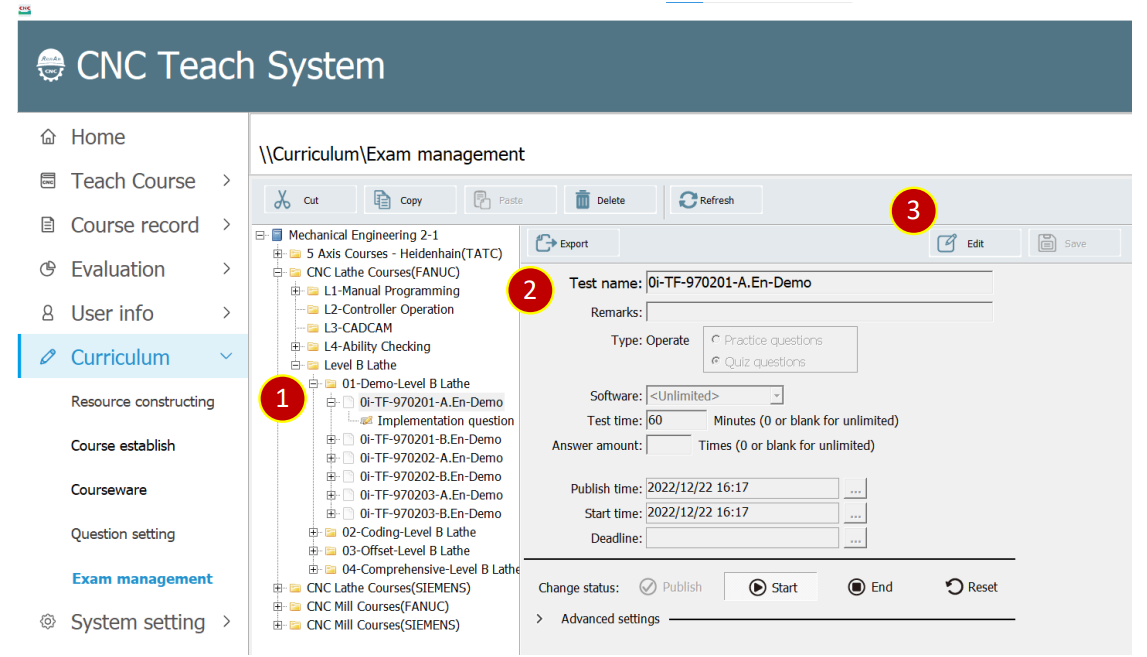
(1) Selet test in the course chapter
(2) Display detail information of the test
(3) Adjust test detail information and status by [Edit] and [Save]
7.6.3 Test Content
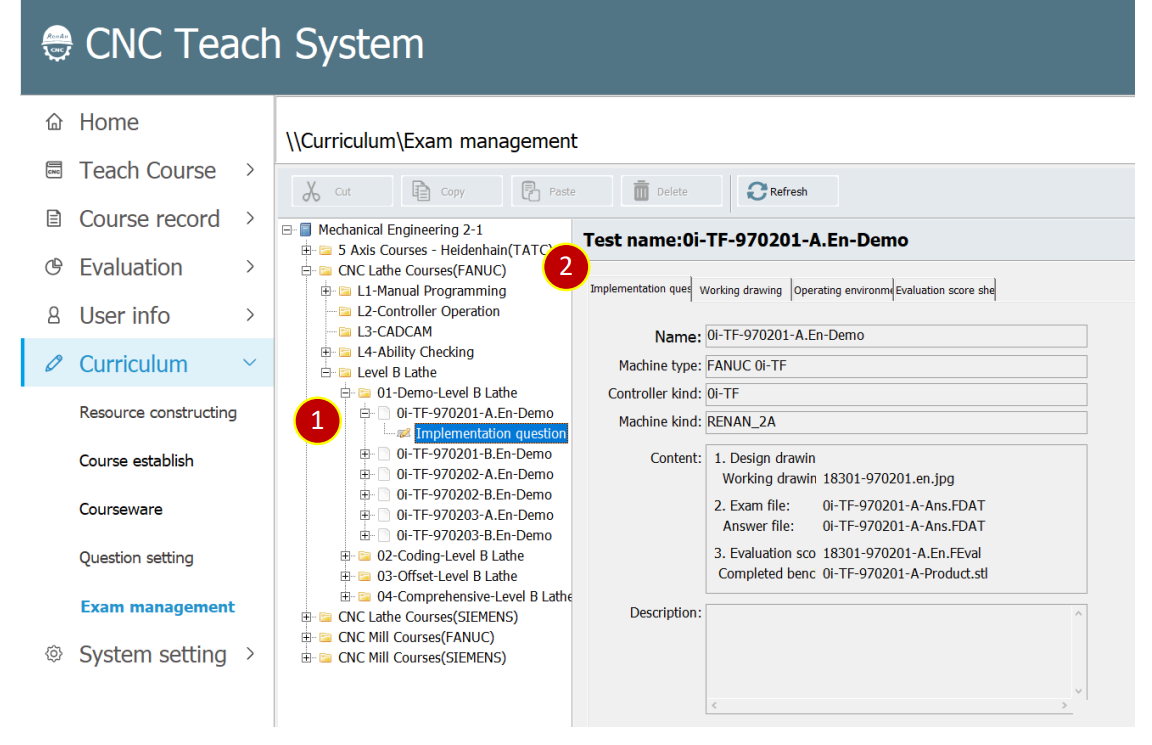
(1) Select test from test questions
(2) Display test content
文章區塊